
Watch this video for a step by step process on how to Configure Remote Access and Connect to a Remote SQL Server 2019
In this article, you will learn to configure remote access on a SQL Server and connect to a remote SQL Server.
Steps to Configure Remote Access on a SQL Server
1. Open Microsoft SQL Server Management Studio by clicking on the Windows icon.

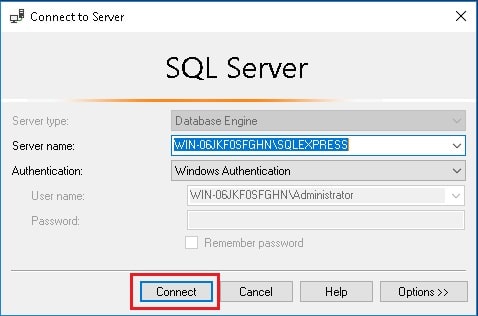
2. Then you will be prompted to connect to the server, here click on Connect.
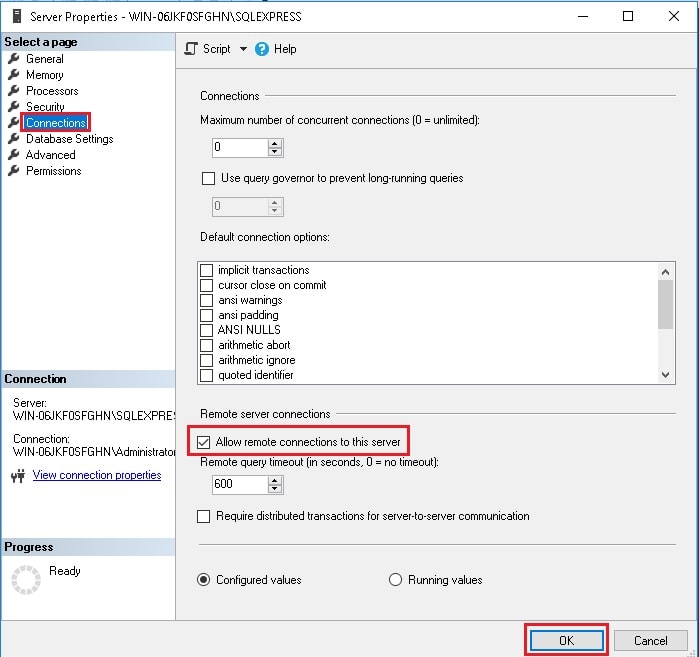
3. To enable remote connection on SQL Server, right – click on the server and click on the Properties option. In the Server Properties dialog under the Connections tab, tick the Allow remote connections to this server option and click on OK.

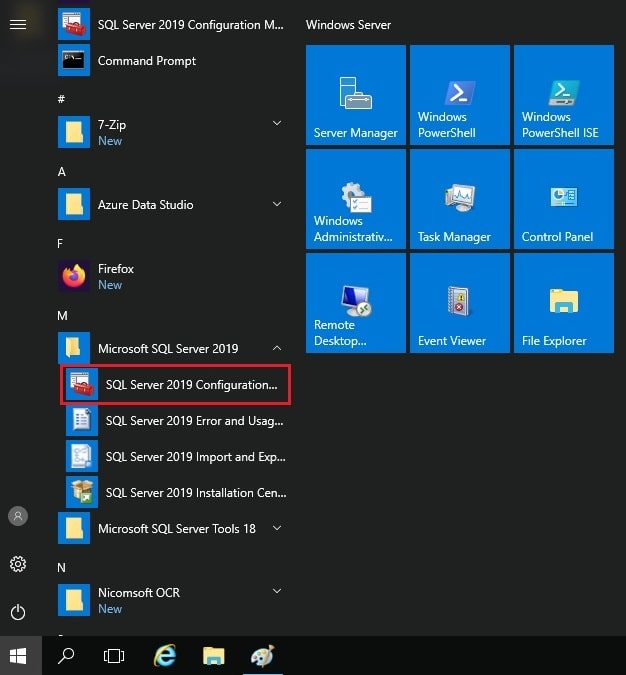
4. Click on the Windows icon on the desktop and click on Microsoft SQL Server 2019. Then click on the drop-down and select the SQL Server Configuration Manager.
5. Then from the SQL Server Network Configuration select Protocols for your server. Ensure that TCP/IP protocol is enabled, if it’s not then right-click on TCP/IP and select the Properties option.

6. Under the Protocol tab, click on the drop-down for Enabled and select Yes. Then go to the IP Addresses tab and scroll down to IPAII.

7. If the TCP Dynamic Ports dialog box displays 0, it indicates that the Database Engine is listening on dynamic ports, delete the 0 and leave the TCP Dynamic Ports blank and set the TCP Port to 1433 and click on Apply. SQL Server uses port 1433 as the default instance.


8. You will be prompted for confirmation, click on OK. Then again click on OK on the TCP/IP Properties.
9. From the left pane of SQL Server Configuration Manager, click SQL Server Services and right-click SQL Server, and click Restart.

Steps to Configure a Windows Firewall for Database Engine Access
For adding a firewall exception for the 1433 port, follow the below steps:
1. Click on Windows icon. Then click on Windows Administrative Tools drop-down, scroll-down and select the Windows Firewall with Advanced Security option.

2. In the Windows Firewall with Advanced Security dialog, click on the Inbound Rules option in the left panel and select the New Rule from the Actions panel. This will open the New Inbound Rule Wizard.

3. In the New Inbound Rule Wizard, under Rule Type, click on the Port option and click Next.

4. In the Protocol and Ports window, mention the protocols and ports to which a rule applies. Select the TCP option under Does this rule apply to TCP or UDP? and in the Specific local ports, text box enter the 1433 port, and click Next.

5. In the Action window, select the Allow the connection option to specify the action to be taken when a connection matches the conditions specified in the rule and click on Next.

6. In the Profile window, specify the profile for which the rule applies. Here we have selected Domain. Then click on Next.

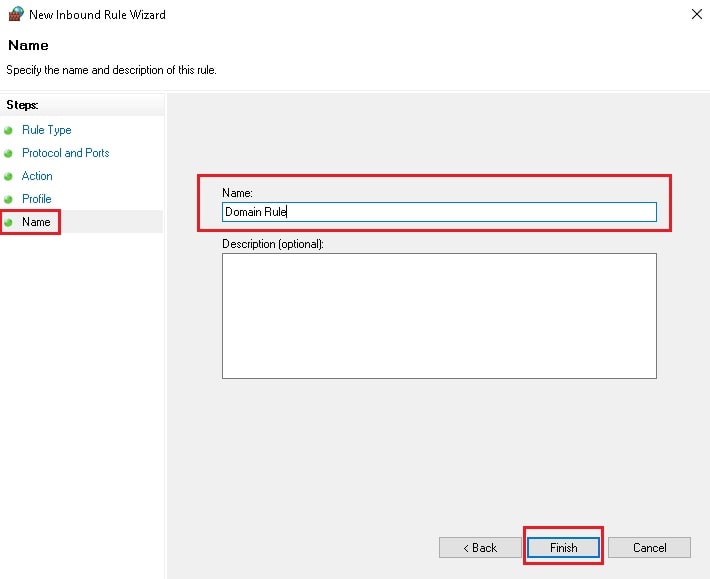
7. In the Name window, enter the name of the created rule and click on Finish.
8. You can now see the created rule in the list of inbound rules.

9. Now to connect to a remote server using the Windows Authentication, go to Server Properties and under the Security tab set the Server authentication to SQL Server and Windows Authentication mode and click on OK.

10. Then you will be prompted for restarting the server or else the changes won’t be reflected. Here, click on OK.

In this way, you can configure remote access and connect to a remote SQL server 2019.


