
Elementor users often experience lagging issues on their websites, suggesting the need to clear Elementor cache to boost the website speed.
Website speed issues can, however, be resolved with website speed caches to improve the website’s performance. Website speed caches store frequently used Elementor data (HTML, images, etc.) on the cache, making it easier to access it on all subsequent visits to the website.
What is Elementor Cache?
A data storage system called Elementor cache saves the static version of the Elementor website. As a visitor arrives on your website, the browser sends multiple requests to your server for access to the database to retrieve the website pages and load them all over again.
How to Clear Elementor Cache [Step-by-Step]
Follow the steps below to clear cache stored in Elementor for your website in WordPress:
Step 1: Go to Elementor Settings
Elementor works with a number of cache files, but for this task, we need to focus on and delete the global CSS cache and browser cache.
With clearing the global CSS cache from Elementor settings, you obtain the latest version of the CSS.
To start, you have to log in to your WordPress dashboard. Once logged in, you will have to go to your Elementor settings in the admin menu, located at the left side of your page. Here, you will go to Elementor > Tools.
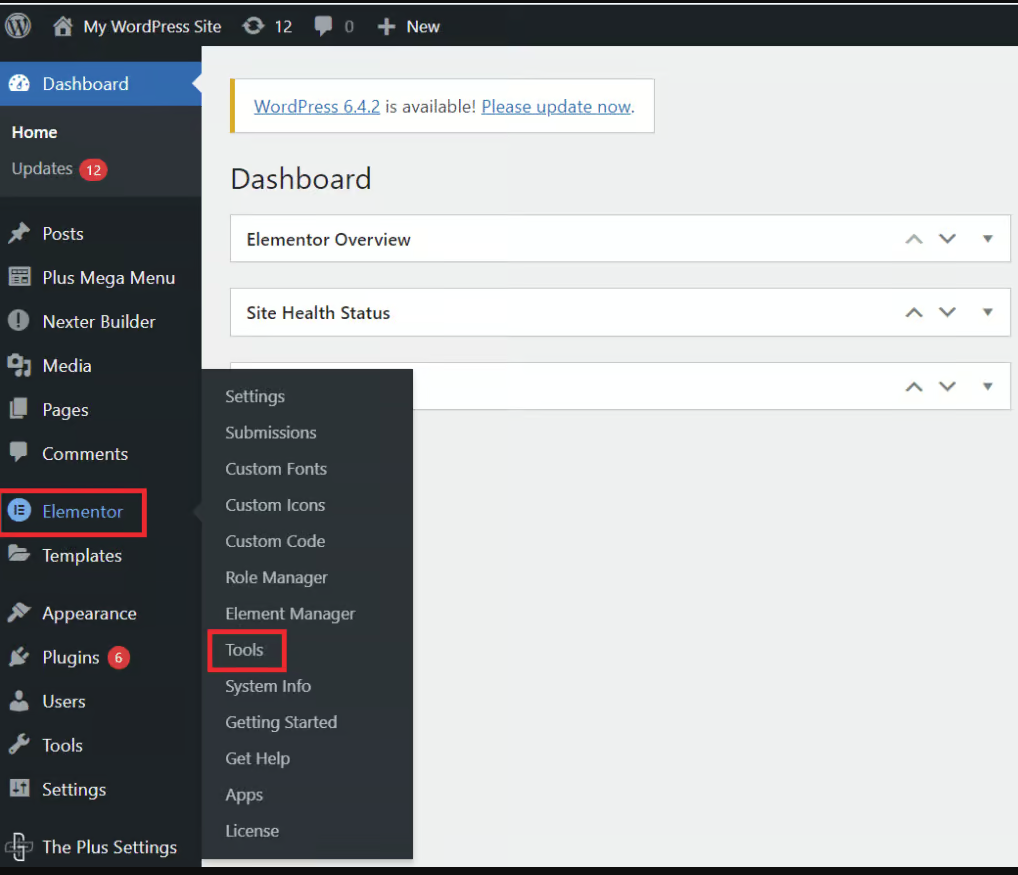
Go to Elementor settings how to clear Elementor cache from the plus addons for Elementor
Step 2: Clear the Elementor Cache
A new page will come up, which shows the Regenerate CSS & Data. Under the General tab, you will have to click on Regenerate Files & Data. After you click on it, you will have to wait for it to finish and then you will see the green check icon and then you will have to click on Save Changes.
After you are done saving the changes, you will have to reload your Elementor website.
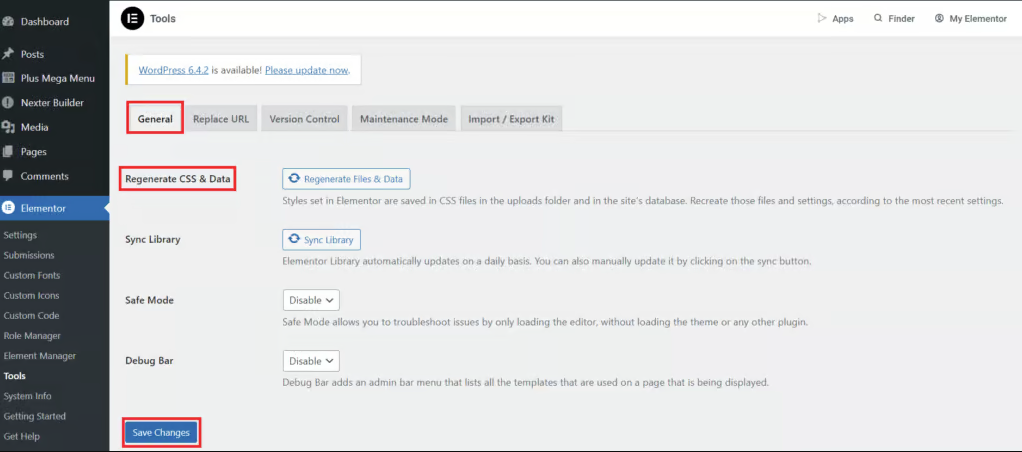
This will clear Elementor cache and regenerate all your CSS files that are used by the Elementor website.
This is a good habit to maintain in order for you to see the changes you have done in the backend being reflected on the front of your website.
Step 3: Empty Your Browser Cache
Along with clearing your Elementor cache, clearing your cache will also help with website speed optimization.
This is due to the fact that the cache browser may also have locally stored or older versions of your website that may create problems on your website.
So, clearing your cache will also have an equally positive effect.
Here are the shortcuts for some of the popular browsers:
- For Chrome, Edge, or Firefox on Windows: Ctrl + F5 or Shift + F5 or Ctrl + Shift + R
- For Chrome or Firefox on Mac: Shift + Command + R
That’s it. You have now completed the steps to clear your cache so your Elementor cache will now allow you to present current website content.
While having cache stored will speed up the loading of your website by having the content on record ready for instant access, it does also lead to some issues with the user experience of the Elementor website.
The issue arises from the fact that the cache will remember an older version of your website, including the data files, and show that version to the user when they first visit. If you have recently updated the website, the user will not see the changes that you have made.


