
The article explains to you how to use the Dropmysite cPanel plugin. The plugin enables you :
• To maintain the off-site backups of website files.
• To maintain the off-site backups of MySQL and PostgreSQL database.
• To maintain the off-site backups of e-mail messages.
• To periodically check if Google Safe Browsing has blacklisted your website.
Dropmysite cPanel plugin enables you to quickly and easily automate backups for website files, databases, and e-mail messages.
You can manage the following items by using Dropmysite cPanel plugin :
• Website backups
• Database backups
• E-mail backups
Is configuring backup necessary?
Dropmysite automatically configures some types of backups. This means, that you don’t need to follow any additional steps to configure backups for your account :
(i) Website backups :
Dropmysite can automatically configure a website backup for your account. There is no need for any additional configuration, though you can create customized site backups if you want.
(ii) Database backups :
Dropmysite can automatically configure backups for any MySQL and PostgreSQL databases that you create through cPanel.
But, if you install an application using Softaculous, or even if you auto-install an application with your initial hosting order, you will need to configure a database backup manually.
(iii) Email backups :
When you purchase Dropmysite with your hosting order, then Dropmysite automatically configures an e-mail backup for your account. No additional configuration will be required.
Website backups –
Automatic configuration of backup (called Website Backup) is taken by Dropmysite for entire home directory, that’s why you normally don’t need to create a manual website backup. However, if you want you can create manual backups of specific directories and subdirectories.
Steps to manage existing website backups :
1. Log in to your cPanel account.
2. Go to the SOFTWARE section of the cPanel home screen, and click on Dropmysite.

Dropmysite dashboard will appear as below :
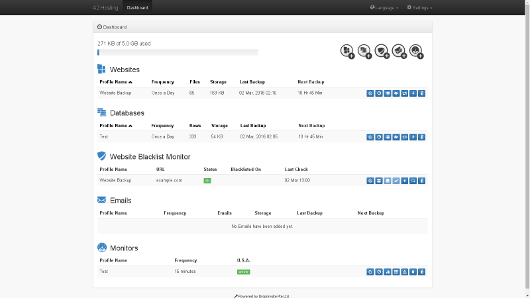
3. Locate Websites, under it locate the backup that you want to manage and then select one of the following points :
• Click on the Edit Connection ![]() icon, to edit the connection.
icon, to edit the connection.
• Click on the Edit Schedule ![]() icon, to edit the schedule.
icon, to edit the schedule.
• Click on Backup History ![]() icon, to view the backup history.
icon, to view the backup history.
• Click on the Download Files ![]() icon, to download the website backup.
icon, to download the website backup.
• Click on the Restore Files ![]() icon, to restore the website backup.
icon, to restore the website backup.
• Click on the Backup Now ![]() icon, to do an immediate website backup.
icon, to do an immediate website backup.
• Click on the Delete ![]() icon, to delete the website backup profile.
icon, to delete the website backup profile.
# Steps to add a website backup manually :
1. Log in to cPanel account.
2. Locate SOFTWARE section on the cPanel home screen and click on Dropmysite.

Now, Dropmysite dashboard will appear :

3. Click on the Add Website ![]() icon.
icon.
4. Specify the site settings on the Connection Details page :
• In the list box for Protocol, select SFTP-SSH File Transfer Protocol.
• You can use a password or public key authentication. Select the Public Key authentication checkbox.
• In the text box for Directory Path, you can optionally specify a path in your home directory.
• In the text box for Port, type 7822.
• In the text box for Host name, type the name of the MilesWeb Hosting server for your account.
• In the text box for User name, type your MilesWeb Hosting account username.
• In case you are using password authentication, then in the Password text box, type your MilesWeb Hosting account password. And if you are using public key authentication then leave the Password text box empty.
5. Click on Next. Dropmysite will test the connection using the values provided by you.
6. Once the connection test is successful, the Schedule Backup page will appear :
• Go to the Directories section and select the subdirectories you want to include in the backup.
• Go to the Exclusions sections and select files or directories that are not included in the backup. To add an exclusion, type the filename or directory, and then press Enter.
• Go to the Retention list box and select how many backups of the site you want to keep at one time.
• Go to the Frequency list box and select how often do you want Dropmysite to take a backup of the website.
• Go to the Start time list box and select the time zone for your geographic location.
7. Click on Next.
8. On the page for Save Profile, in the Profile Name text box, type a name for the website backup. You can give any name of your choice.
9. Click on Save. The website backup will now be configured and active.
# Database Backups
Dropmysite is able to back up MySQL and PostgreSQL databases.
Perform the following steps to manage database backups :
1. Log in to cPanel account.
2. Locate the SOFTWARE section on the cPanel home screen, and click on Dropmysite :

Now, the Dropmysite dashboard will appear :

3. Locate Databases, under it locate the backup that you want to manage and then select one of the following points :
• Click on the Edit Connection ![]() icon, to edit the connection.
icon, to edit the connection.
• Click on the Edit Schedule ![]() icon, to edit the schedule.
icon, to edit the schedule.
• Click on Backup History ![]() icon, to view the backup history.
icon, to view the backup history.
• Click on the Download Files ![]() icon, to download the website backup.
icon, to download the website backup.
• Click on the Restore Files ![]() icon, to restore the website backup.
icon, to restore the website backup.
• Click on the Backup Now ![]() icon, to do an immediate website backup.
icon, to do an immediate website backup.
• Click on the Delete ![]() icon, to delete the website backup profile.
icon, to delete the website backup profile.
# Steps to add a database backup :
1. Log into cPanel account.
2. Locate the SOFTWARE section on the cPanel home screen, and click on Dropmysite.

Now, Dropmysite dashboard will appear :

3. Click on the Add Database ![]() icon.
icon.
4. On the page for Connection Details, specify the database settings :
• Select MySQL, in the Database type list box.
• Confirm that the Port text box is set to 3306.
• In the text box for Host name, type the name of MilesWeb Hosting server for your account.
• In the text box for Database name, type the name of the database you want to back up.
• In the text box for User name, type the name of the MySQL database user for the database.
• In the text box for Password, type the password for the MySQL database user.
5. Click on NEXT. Dropmysite will test the database connection using the values provided by you.
6. Once the database connection test is successful, then the Schedule Backup page will appear :
• In the list box for Retention, select how many backups of the database you want to keep at one time.
• In the list box for Frequency, select how often you want Dropmysite to back up the database.
• In the list box for Start time, select when you want Dropmysite to do the database backup.
• In the list box for Time zone, select the time zone for your geographic location.
7. Click on Next.
8. On the page for Save Profile, go to Profile name text box and type a name for the database backup. The name can be anything of your choice.
9. Click on Save. The database backup now will be configured and activated.
# Email Backups
Dropmysite is able to back up the files from your domain’s e-mail accounts.
Steps to add an e-mail backup :
1. Log in to cPanel.
2. In the SOFTWARE section on the cPanel home screen, click on Dropmysite.

The Dropmysite dashboard will appear :

3. Click on the Add Email ![]() icon.
icon.
4. On the page for Connection Details, specify the site settings :
• In the list box for Protocol, select SFTP-SSH File Transfer Protocol.
• You can use password authentication or public key authentication. Check the public key authentication checkbox to do it.
• In the text box for Port, type 7822.
• In the text box for Host name, type the name of the MilesWeb Hosting server for your account.
• In the text box for User name, type your MilesWeb Hosting account username.
• In case you are using password authentication, then type your MilesWeb Hosting account password in the Password text box. But, if you are using public key authentication, then leave the Password text box empty.
5. Click on Next. Dropmysite will test the connection using the values provided by you.
6. Once the connection test is successful, then the Schedule Backup page will appear :
• In the section for Directories, clear the checkbox for the directory and then select the checkbox for the mail directory.
• In the list box for Retention, select how many backups of the site you want to keep at one time.
• In the list box for Frequency, select how often you want Dropmysite to do the e-mail backup.
• In the list box for Start time, select when you want Dropmysite to do the e-mail backup.
• In the list box for Time zone, select the time zone for your geographic location.
7. Click on Next.
8. On the page for Save Profile again, go to Profile name text box and type a name for the e-mail backup. The name can be anything of your choice.
9. Click on Save. The e-mail backup will now be configured and activated.
# Steps to manage e-mail backups :
1. Log in to cPanel account.
2. In the SOFTWARE section on the cPanel home screen, click on Dropmysite.

Now, the Dropmysite dashboard will appear :

3. Locate Emails, under it locate the backup that you want to manage, and then select one of the following options :
• Click the Edit Connection ![]() icon, to edit the connection.
icon, to edit the connection.
• Click the Edit Schedule ![]() icon, to edit the schedule.
icon, to edit the schedule.
• Click the Backup History ![]() icon, to view the backup history.
icon, to view the backup history.
• Click the Download Emails ![]() icon, to download e-mail backup files.
icon, to download e-mail backup files.
• Click the Restore Emails ![]() icon, to restore the e-mail backup.
icon, to restore the e-mail backup.
• Click the Backup Now ![]() icon, to do an immediate e-mail backup.
icon, to do an immediate e-mail backup.
• Click the Delete ![]() icon, to delete the e-mail backup profile.
icon, to delete the e-mail backup profile.


