
You can build your website locally on your computer with the software such as WAMP (for Windows) or MAMP (for Mac) to speed up your website development.
After you have finished developing your website, you need to move it from your computer to a live site and share it globally. You will learn to easily move WordPress from local server to a live site in this article.
There are two different methods for moving WordPress from local server to your live website (step by step).
In this method, you will use WordPress migration plugin and is recommended for beginners. In the second method, you will learn to manually move WordPress from local server to a live site.
Tips Before Starting the Migration
To migrate WordPress from localhost to live server, you need to consider a few things.
First, assume that you have a WordPress site running on local server (also called localhost) on your computer, and you have complete access to it.
Then you will need to have a domain name and web hosting.
MilesWeb offers the best Managed WordPress Hosting with pay-as-you-go cloud model. Scale at ease, grow your website with robust cloud platforms DigitalOcean and VULTR.
At last, you need to have a FTP program and knowledge of using FTP for uploading your content to the live site.
So are you ready? Let’s begin with your WordPress site migration.
Moving WordPress from Local Server to Live Site With a Migration Plugin
Beginners will find this method easy to follow and so is highly recommended for them. Here, you will use a WordPress migration plugin to move WordPress from localhost to a live site.
Step 1. Installation and Setup of Duplicator Plugin
At first, you need to install and activate the Duplicator plugin on your local site.
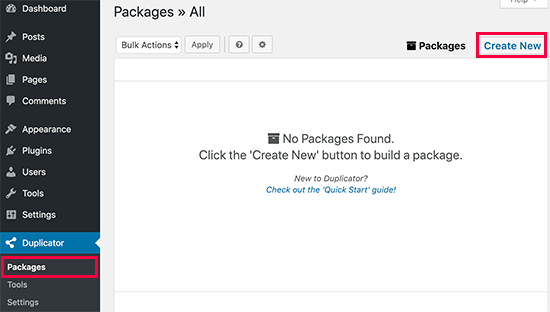
Once the plugin is activated, go to Duplicator » Packages page and click on the ‘Create New’ button.
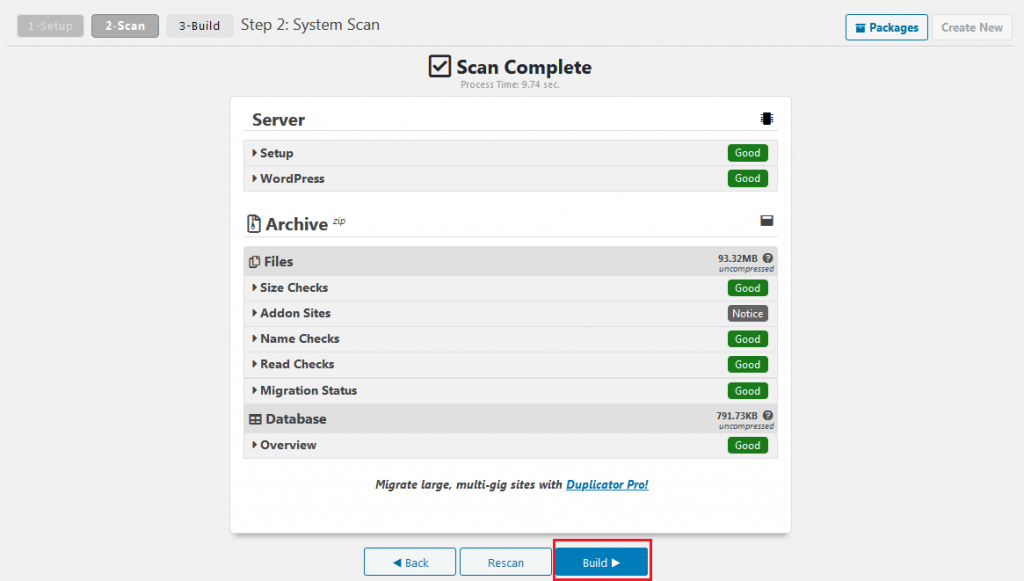
In order to continue, click on the Next button.
Now, the Duplicator will run some tests to check if everything is in order. In case all are marked ‘Good’ then click on the ‘Build’ button.
It is take a few minutes for processing based on your website’s size. Keep this tab open until the process gets completed.
Once the process is complete, you will find the download options for Installer and the Archive package. Just click on the ‘One click download’ link to download both files to your computer.
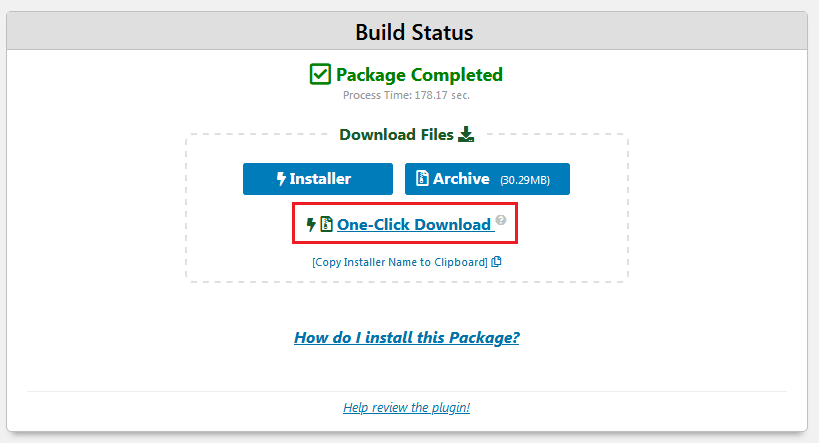
From these files, the archive file is a complete copy of your WordPress website. It comprises of all WordPress core files along with your images, themes, plugins, uploads and a backup of your WordPress database.
The installer file is a script that automates the migration by unpacking the archive file.
Step 2. Creating a Database for Your Live Site
Prior to running the installer or uploading the WordPress website from localhost to your hosting server, create a MySQL database for your live website.
In case there is already a MySQL database created, skip this step.
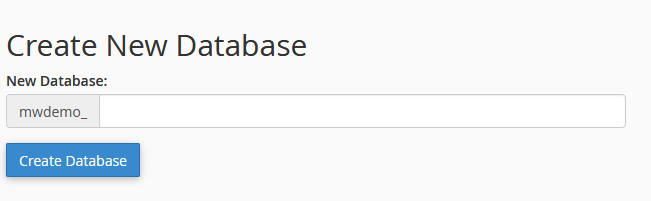
For creating a database, visit your hosting account’s cPanel dashboard. Then go to the Databases section and click on the MySQL Databases icon.

Then, you’ll see a field to create a new database. Just enter the name for your database and click on the ‘Create Database’ button.
This will create a new database. Then go to the MySQL Users section.
Enter a username and password for your new user and click on the ‘Create User’ button.
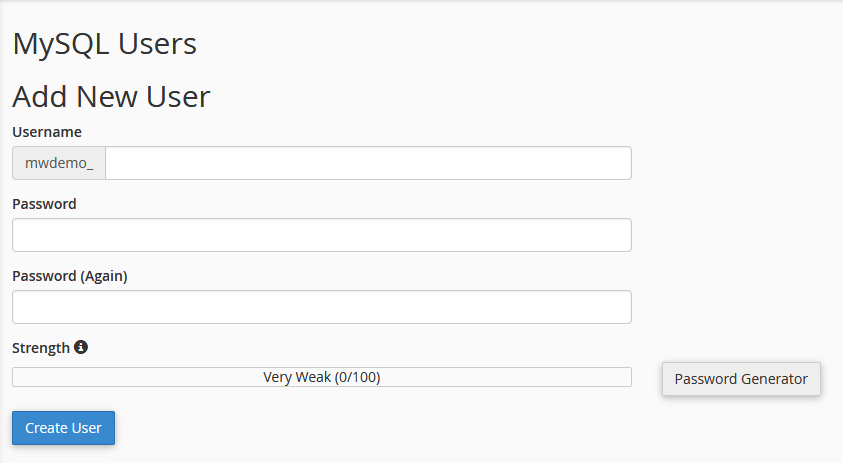
The new user created won’t have permission to work on the database. So, you will need to change it.
Go to the ‘Add User to Database’ section and select the database user you created from the dropdown menu next to the ‘User’ field. Next select the database, and click on the Add button.
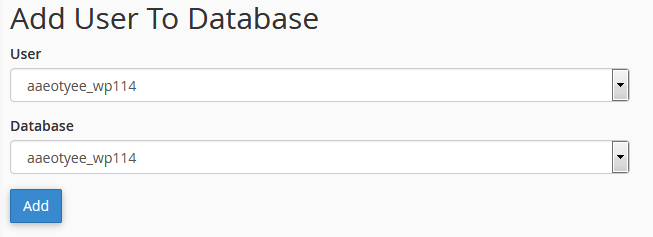
Now your database is ready to use with your WordPress site. Ensure that you note down the database name, username, and password as this information will be needed in the next step.
Step 3. Uploading Files from Local Server to Live Site
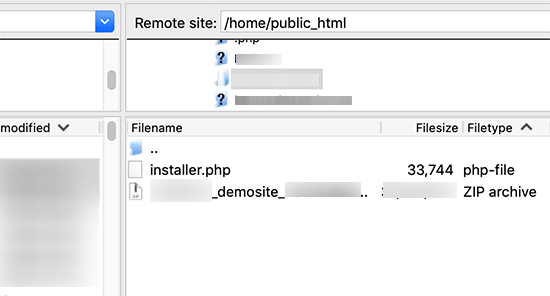
Then upload the archive and installer files from your local site to your hosting account.
For this, connect to your live site with an FTP client. Then make sure that the root directory of your website is completely empty.
Generally, root directory is the /home/public_html/ folder.
Some WordPress hosting companies offer pre-configured WordPress when you sign up. If you have WordPress files there then delete them.
Now upload the archive and installer files from Duplicator to your empty root directory.
Step 4. Runing The Migration Script
After uploading the migration files, visit the following URL in your browser:
http://example.com/installer.php
Enter your own domain name instead of example.com.
With this, the Duplicator migration wizard will get opened.
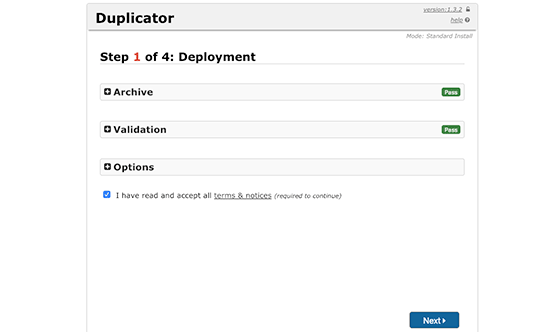
Automatic scanning will be done by the installer for the archive file and it will run a validation test. Ensure to check the terms & conditions checkbox and continue by clicking on the Next button.
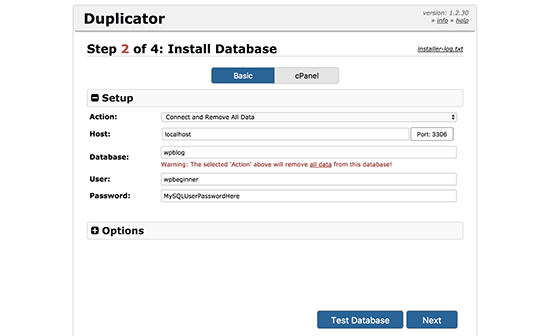
Then you will be asked to enter your WordPress database information.
Your host will be localhost. After that, enter the details of the database created in the earlier step.
Click on the Next button to continue.
Your WordPress database backup will now be imported by Duplicator from the archive into your new database.
Next, you will be prompted to update site URL or Path. There is no need to change anything as the URL of your live website, and its path is automatically detected.
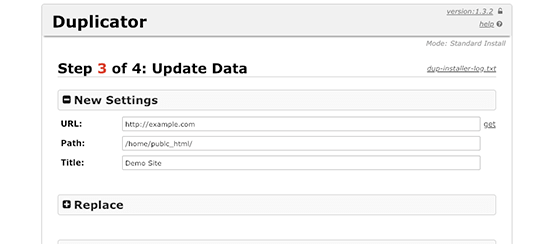
To continue further, click on the Next button.
Now, Duplicator will complete the migration and show you a success screen. Then click on the ‘Admin Login’ button to enter the WordPress admin area of your live site.
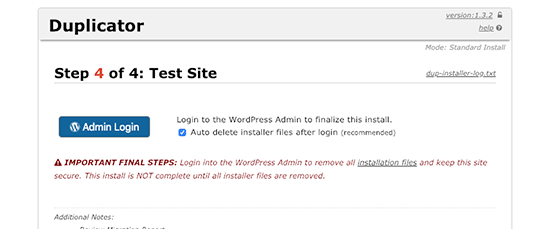
After you login to your live site, Duplicator will clean up the installation files automatically.
That’s all! You have successfully moved WordPress from local server to your live site using the Duplicator plugin.


