
What is AutoSSL?
Understanding AutoSSL from cPanel
AutoSSL is a cPanel utility that facilitates the procurement and installation of an SSL certificate issued by Let’s Encrypt. In other words, it’s a free SSL certificate issued for web owners to endorse secured business dealings over the network. It enhances website security, boosts user trust and search engine rankings by automatically securing your website.
Similar Read: How to Activate Let’s Encrypt SSL Certificate for Your Website?
Steps to Install & Configure AutoSSL in cPanel
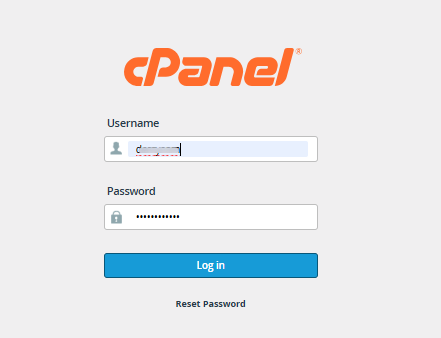
Step 1: Log in to Your cPanel Account
- Begin by logging in to your cPanel account using the credentials provided by your web hosting provider.
- Enter your username and password on the login page and click Log in to access your dashboard.
Step 2: Navigate to SSL/TLS Certificates
Once you are inside the cPanel dashboard:
- Scroll down to the Security section
- Look for the SSL/TLS Certificates option
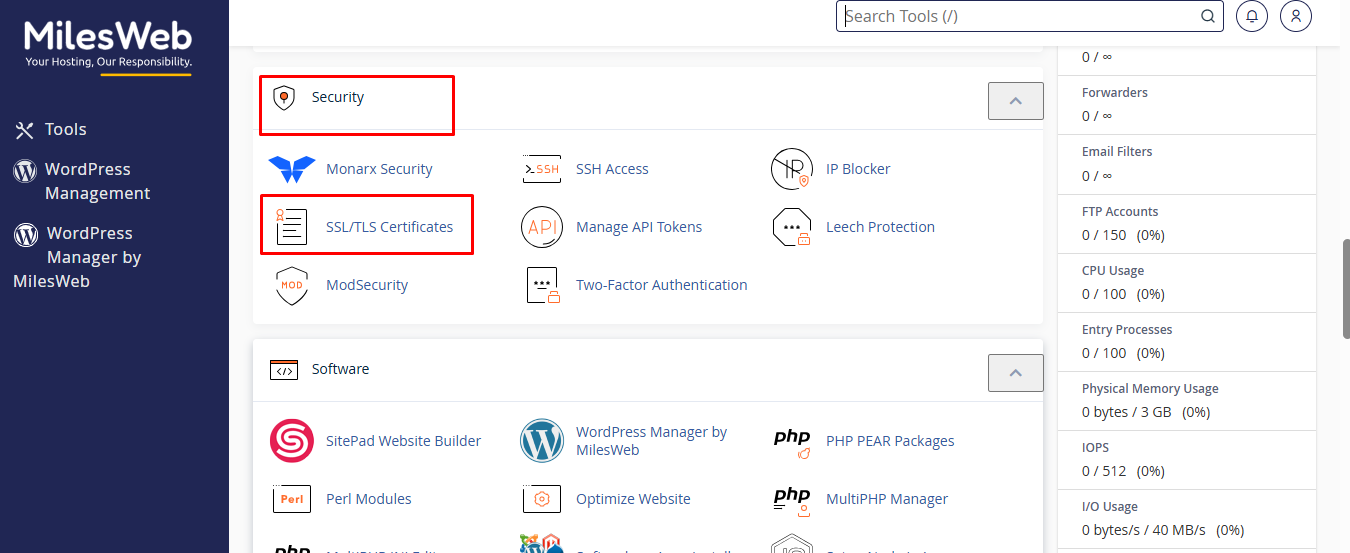
- Click on it to proceed
This section allows you to manage SSL certificates, including:
- Wizard
- Status
- Certificates
- Keys
- Requests
- Installation
- Settings
Step 3: Access the Wizard Tab in SSL/TLS Certificates
After opening the SSL/TLS Certificates section, you will land on the Wizard tab by default.
The Wizard tab helps you issue and install SSL certificates for your domains in a guided, step-by-step manner.
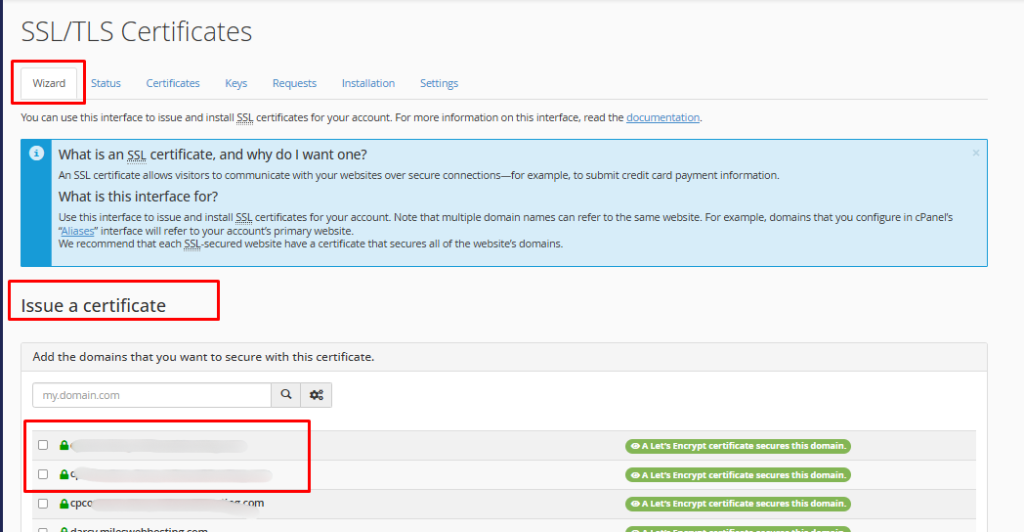
Understanding the Wizard Section
The Wizard interface is designed to simplify SSL installation. Below is a breakdown of each element:
1. Issue a Certificate
- This is the main section where you begin the SSL installation process.
- It allows you to request a new SSL certificate for your domain
- The system will guide you through selecting domains and proceeding with certificate issuance
2. Add Domains to Secure
In this field:
- You can manually enter a domain name (e.g., yourdomain.com)
- Alternatively, select from the list of available domains and subdomains linked to your account
- This ensures that the selected domains will be secured with an SSL certificate.
3. Domain List with SSL Status
Below the input field, you will see a list of all domains and subdomains associated with your cPanel account.
- Each domain shows its current SSL protection status
- Domains already secured display a green label indicating an active SSL (e.g., Let’s Encrypt certificate secures this domain)
- Unsecured domains can be selected for SSL installation
4. Domain Selection Checkboxes
- Each domain has a checkbox next to it
- Select the domains you want to secure with SSL
- This allows you to install SSL for multiple domains or subdomains at once.
5. Continue Button
After selecting the required domains:
- Click the Continue button
- This will move you to the next step of certificate issuance and installation
Important Note
- Domains already secured with a valid SSL certificate do not require reinstallation
- The Wizard ensures a simplified SSL setup process for both beginners and advanced users.
Step 4: Access the Status Tab
Click on the Status tab within the SSL/TLS Certificates interface. This section allows you to view and monitor the SSL status of all domains and subdomains associated with your cPanel account.
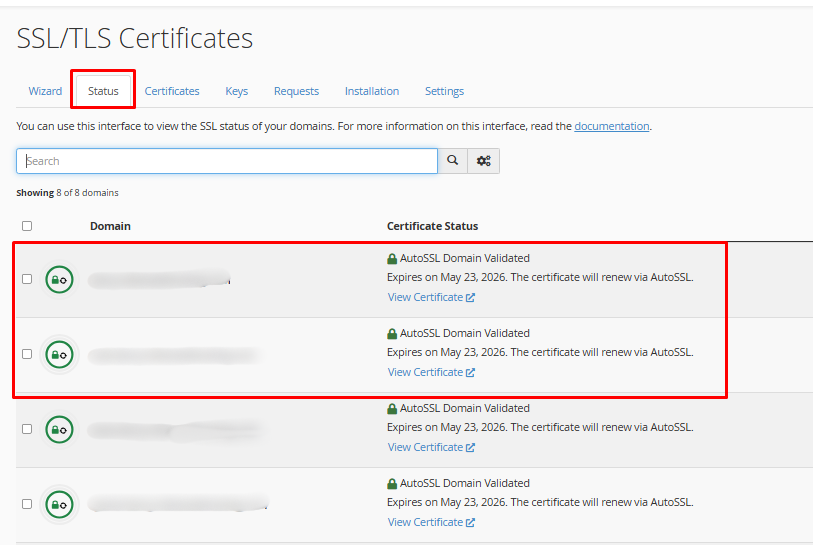
Understanding the Status Section
The Status tab provides a complete overview of SSL installation and validity. Below is a breakdown of its components:
1. Search Bar
This is located at the top of the page and allows you to quickly find a specific domain or subdomain.
2. Domain List
- Displays all domains and subdomains linked to your hosting account
- Each entry represents a domain that can be secured using SSL
3. Certificate Status Column
This column shows the current SSL status for each domain:
- AutoSSL Domain Validated: Indicates that the SSL certificate is active
- Expiry Date: Displays certificate validity
- Auto-Renewal: Confirms automatic renewal via AutoSSL
4. SSL Status Icons
- Green lock icons indicate that the domain is secured with SSL
- Any warning or missing icon may indicate that SSL is not installed or requires attention
5. View Certificate Option
- Each domain includes a “View Certificate” link
- Clicking this allows you to inspect certificate details such as issuer, validity, and encryption
6. Domain Selection Checkboxes
- Checkboxes are available beside each domain
- You can select specific domains to perform actions like running AutoSSL (if applicable)
Important Note
- If a domain does not show as secured, you can return to the Wizard tab or use AutoSSL to install the certificate
- AutoSSL automatically renews certificates before expiry, ensuring uninterrupted security
Step 5: Access the Certificates Tab
The Certificates tab within the SSL/TLS Certificates interface allows you to view, manage, upload, and generate SSL certificates for your domains.
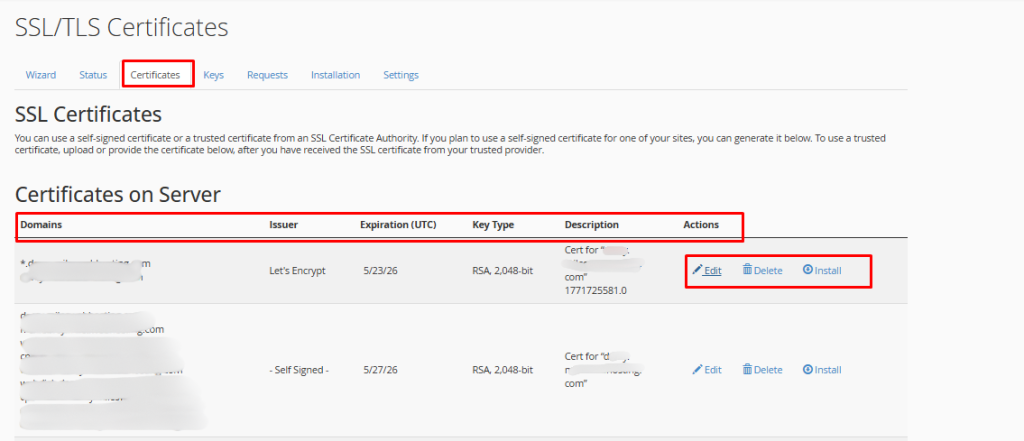
Understanding the Certificates Section
The Certificates tab is divided into two main parts:
1. Certificates on Server
This section displays all SSL certificates currently installed or available on your server.
Key Components:
Domain Name
- Shows the domain(s) associated with each certificate
- A single certificate may cover multiple domains or subdomains
Issuer
- Indicates the Certificate Authority (CA) that issued the SSL certificate
- Example: Let’s Encrypt or Self-Signed
Expiration (UTC)
- Displays the expiry date of the certificate
- Important for tracking validity and renewal timelines
Key Type
- Shows the encryption type used (e.g., RSA 2048-bit)
- Indicates the strength of the SSL certificate
Description
- Provides additional details about the certificate
- May include domain name or internal reference
Actions
Each certificate includes the following options:
- Edit: Modify certificate details
- Delete: Remove the certificate from the server
- Install: Install the certificate for a selected domain
Important Notes
- Certificates issued via AutoSSL (e.g., Let’s Encrypt) are automatically managed and renewed
- Avoid deleting active certificates unless necessary
2. Upload a New Certificate
This section allows you to manually upload an SSL certificate obtained from a third-party Certificate Authority.
Available Options:
Paste Certificate
- Paste the certificate content (CRT) directly into the text box
- Useful when you receive the certificate in text format
Upload Certificate File
- Upload a .crt file from your local system
- Suitable when the certificate is provided as a file
Description Field
- Add a label or note for easy identification of the certificate
Save / Upload Certificate
- Click Save Certificate after pasting content
- Click Upload Certificate after selecting a file
3. Generate a New Certificate (Self-Signed)
This option allows you to generate a self-signed SSL certificate and is typically used for testing or internal purposes. However, remember that it’s not recommended for live/public websites due to trust warnings in browsers.
Important Note
- For production websites, always use trusted SSL providers like Let’s Encrypt (via AutoSSL)
- Manual upload is only required when using third-party paid SSL certificates
Step 6: Access the Keys Tab
The Keys tab within the SSL/TLS Certificates interface allows you to manage private keys, which are essential for SSL certificate encryption and security.
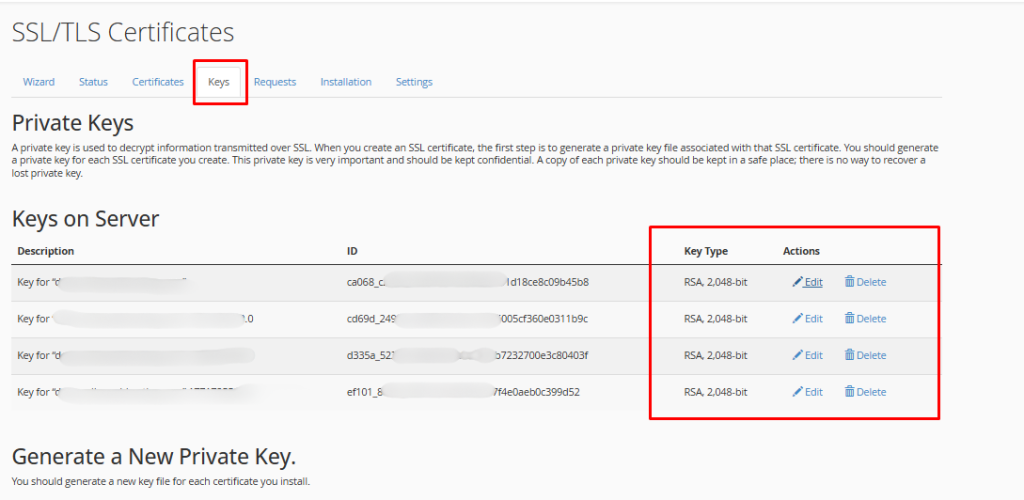
Understanding the Keys Section
The Keys tab is divided into multiple parts for managing private keys:
1. What is a Private Key?
A private key is used to decrypt encrypted data transmitted over SSL
It is generated during the SSL certificate creation process
Each SSL certificate must have a unique private key
Important:
Private keys are confidential and critical
Always store a backup in a secure location
Lost private keys cannot be recovered
2. Keys on Server
This section lists all private keys available on your server.
Key Components:
- Description: Displays the domain or identifier associated with the key
- ID: A unique identifier generated for each private key
- Key Type: Shows encryption strength (e.g., RSA 2048-bit)
- Actions: Manage or use the key for SSL installation (options may vary depending on configuration)
Note:
- Multiple keys may exist for the same domain due to renewals or reissues
3. Generate a New Private Key
This option allows you to create a new private key.
Key Type
- Default: RSA, 2048-bit (recommended)
- Description (Optional): Add a label to identify the key easily
When to Use:
- When generating a new SSL certificate
- When setting up a certificate manually
4. Upload a New Private Key
If you already have a private key, you can upload it using this section.
Available Methods:
- Paste Key: Paste the private key content directly into the text box
- Upload .key File: Upload the key file from your local system
- Description (Optional): Add a name or note for reference
- Upload Button: Click to save and upload the private key to the server
Important Note
- Ensure the private key matches the SSL certificate you plan to install
- Mismatched keys will cause SSL installation to fail
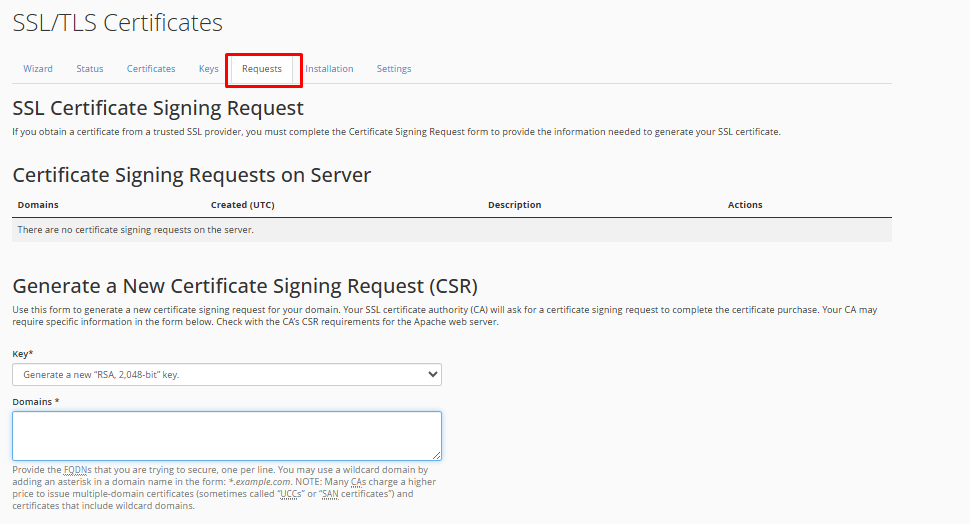
Step 7: Access the Requests Tab
The Requests tab within the SSL/TLS Certificates interface is used to generate and manage Certificate Signing Requests (CSRs) required for obtaining SSL certificates from third-party Certificate Authorities (CAs).
Understanding the Requests Section
1. What is a Certificate Signing Request (CSR)?
- A CSR is a block of encoded text that contains your domain and company details
- It is required when purchasing an SSL certificate from a trusted Certificate Authority
- The CA uses this information to generate your SSL certificate
2. Certificate Signing Requests on Server
This section displays all existing CSRs generated on your server.
Key Components:
- Domains: The domain(s) associated with the CSR
- Created (UTC): Date and time when the CSR was generated
- Description: Optional label for identification
- Actions: Options to manage the CSR
Note: If no CSR exists, the section will display a message indicating that there are no requests on the server
3. Generate a New Certificate Signing Request (CSR)
This is the main section used to create a new CSR.
- Key: Option to generate a new private key (Default: RSA, 2048-bit). This key will be associated with the CSR
- Domains: Enter the fully qualified domain name (FQDN), example: yourdomain.com. You can also use wildcard domains (e.g., *.yourdomain.com)
- City: Enter the full name of your city and avoid abbreviations.
- State: Enter the full name of your state or province and avoid abbreviations
- Country: Select your country from the dropdown list
- Company: Enter your legally registered business name
- Company Division: It’s an optional field for department or division name
- Email: Provide a valid email address for verification
- Passphrase: Optional security phrase (if required by the Certificate Authority) and avoid using sensitive or important passwords
- Description: Again this is optional label to help identify the CSR
- Generate Button: After filling in all required details, click the Generate button. The CSR will be created and can be submitted to your Certificate Authority
Important Note
- CSRs are mainly required for paid or third-party SSL certificates
- If you are using AutoSSL (Let’s Encrypt), this process is handled automatically
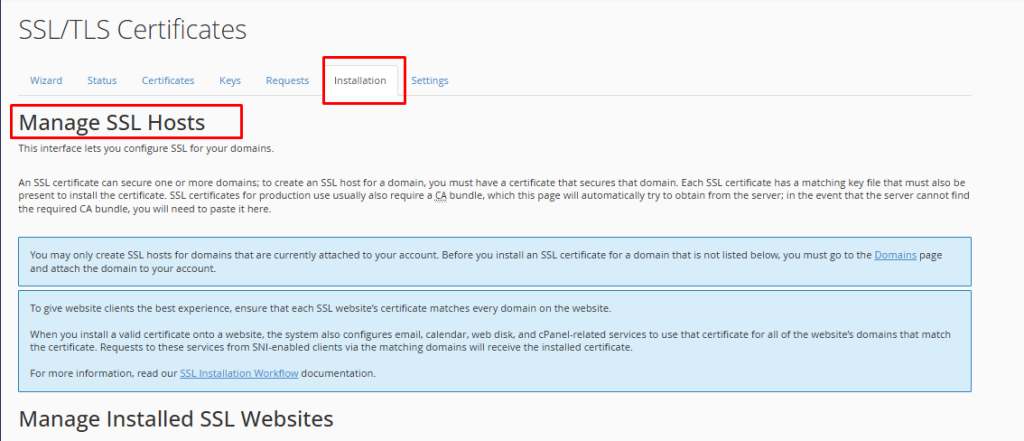
Step 8: Access the Installation Tab
This section allows you to install, manage, update, or remove SSL certificates for your domains.
Understanding the Installation Section
1. What is SSL Installation?
SSL installation links a certificate + private key + domain
This process enables HTTPS and secures your website
A valid SSL certificate must match the domain you are installing it on
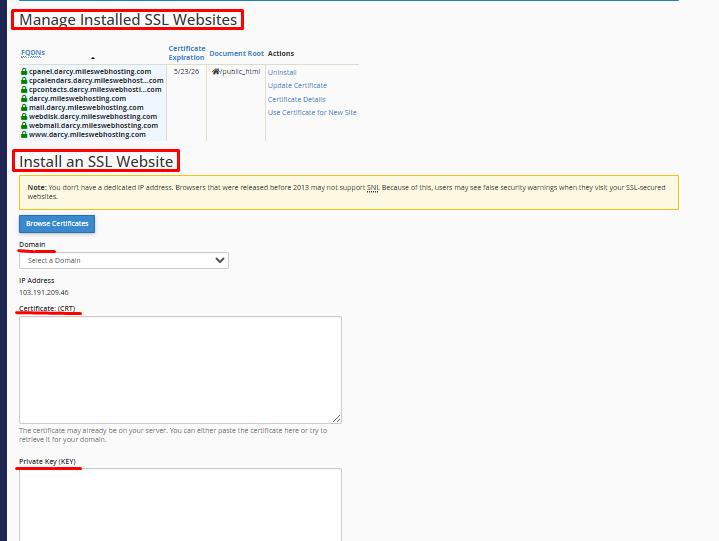
2. Manage Installed SSL Websites
This section displays all domains where SSL is currently installed.
Key Components:
- FQDNs (Fully Qualified Domain Names): Lists all domains and subdomains secured by the certificate
- Certificate: Displays the installed SSL certificate associated with the domains
- Expiration: Shows the certificate expiry date
- Document Root: Displays the directory where the website files are stored (e.g., /public_html)
- Actions: You can manage installed SSL certificates using the following options:
- Uninstall: Remove the SSL certificate from the domain
- Update Certificate: Replace or renew the existing certificate
- Certificate Details: View complete certificate information
- Use Certificate for New Site: Apply the same certificate to another domain
Important Notes
When a certificate is installed, it is automatically applied to related services such as:
- Webmail
- cPanel access
- Web Disk
Only domains added to your hosting account can have SSL installed
3. Install an SSL Website
This section allows you to manually install an SSL certificate.
Fields:
- Domain: Select the domain you want to secure from the dropdown.
- IP Address: Displays the server IP address associated with your domain.
- Certificate (CRT): Paste your SSL certificate here. You can also attempt to auto-fetch it if it is already present on the server.
- Private Key (KEY): Paste the matching private key, remember here the system may auto-detect it if already available.
- Certificate Authority Bundle (CABUNDLE): this contains intermediate certificates from the Certificate Authority: It’s usually auto-fetched by the server and only required if not automatically detected.
Additional Note
- If you don’t have a dedicated IP address, SSL will use SNI (Server Name Indication)
- Modern browsers support SNI, but very old browsers (pre-2013) may show warnings
When to Use This Section
- When installing a third-party SSL certificate manually
- When updating or replacing an existing SSL certificate
Important Note
- If you are using AutoSSL (Let’s Encrypt), installation is handled automatically
- Manual installation is only required for custom or paid SSL certificates
Step 9: Access the Settings Tab
The Settings tab within the SSL/TLS Certificates interface section allows you to configure the default key type used when generating SSL certificates and Certificate Signing Requests (CSRs).

Understanding the Settings Section
- Default Key Type for SSL/TLS Certificates: This setting determines the type of encryption key that will be used when:
- Generating new SSL certificates
- Creating Certificate Signing Requests (CSRs)
- Available Key Types
You can choose from the following options:
- Use System Default (Recommended): Automatically selects the recommended key type and is the best option for compatibility and performance.
- RSA, 2048-bit: Standard and widely supported encryption method that provides a good balance of security and performance.
- RSA, 4096-bit: Offers stronger encryption compared to 2048-bit but it may slightly impact performance due to higher computational load.
- ECDSA, P-256 (prime256v1): This is a modern encryption method, has faster performance with strong security and supports most modern browsers.
- ECDSA, P-384 (secp384r1): Its higher security than P-256 but more resource-intensive.
Save Settings
- After selecting your preferred key type, click the Save button
- The selected key type will be used for all future SSL and CSR generation
Important Note
- If you are unsure, always use the system default setting
- Changing the key type does not affect already installed certificates
Validate the SSL Certificate
After running AutoSSL or installing an SSL certificate, it is important to verify that the certificate is active and properly configured.
You can validate the SSL installation using the following methods:
1. Using cPanel (Recommended)
- Go to SSL/TLS Certificates → Status tab
- Check your domain status
- It should display AutoSSL Domain Validated
2. Browser Verification
- Open your website using https://yourdomain.com
- Look for the padlock icon in the browser address bar
- Click the padlock to view certificate details
3. External Tools (Optional)
- You can use tools like SSL Shopper to check certificate status
- Enter your domain name to confirm proper installation
- Troubleshooting AutoSSL Issues
Troubleshoot: Fix “Not Secure” SSL Issues
If your website still shows “Not Secure” or the SSL certificate is not working correctly, check the following:
1. Mixed Content Issues
- Ensure your website does not load resources over HTTP
- Update all URLs (images, scripts, CSS) to use HTTPS
2. Conflicting or Existing Certificates
- Go to SSL/TLS Certificates → Certificates tab
- Remove any expired or self-signed certificates
- Return to the Status tab and run AutoSSL again
3. Domain Verification Failure
SSL providers verify domain ownership before issuing certificates. If validation fails:
- Check A Record
- Ensure your domain points to the correct server IP
- Check AAAA Records
- Remove unnecessary or incorrect IPv6 (AAAA) records
4. .htaccess File Interference
Custom redirect rules may block SSL validation. Add the following code at the top of your .htaccess file:
RewriteCond %{REQUEST_URI} !^/[0-9]+\..+\.cpaneldcv$
RewriteCond %{REQUEST_URI} !^/\.well-known/acme-challenge/.+$
RewriteCond %{REQUEST_URI} !^/\.well-known/acme-challenge/[0-9a-zA-Z_-]+$
RewriteCond %{REQUEST_URI} !^/\.well-known/pki-validation/[A-F0-9]{32}\.txt(?:\ Comodo\ DCV)?$
5. AutoSSL Option Not Visible
- If you cannot find the AutoSSL option, it may be disabled
- Contact your hosting provider to enable it
6. Wait for Processing Time
- SSL installation may take up to 1 hour
- Recheck the status after some time
Installing SSL via AutoSSL in cPanel is a simple and efficient way to secure your website using free certificates. With the updated interface, managing SSL certificates has become more streamlined and user-friendly.
Ensuring your website is secured with HTTPS not only protects user data but also improves trust, credibility, and search engine rankings. Regularly monitor your SSL status and resolve issues promptly to maintain uninterrupted security.


