Picture yourself at a stadium trying to locate someone sitting three rows behind you. You have no clue what seat number they’re in, so the task seems impossible! That is exactly how it feels searching through rows of unstructured data.
Metabase is a wonderful tool for turning raw data into beautiful charts and dashboards. However, beginners find the initial setup and workflow difficult to manage. If you are just starting out, you might be surprised by how tricky the process can feel. Since commands related to Docker are generally foreign in nature, setting up the VPS server seems overwhelming for an inexperienced user. Almost all tutorials skip over fundamental beginner-related content during the installation of Docker Metabase.
Fortunately, transitioning from a completely clean server to a fully functional working visual display via Docker Metabase isn’t as complicated and time-consuming. By following this guide, you will be able to successfully install Docker Metabase on your Ubuntu VPS system using a completely new, beginner perspective with no prerequisites and no steps skipped.
Once you finish the installation using this detailed MilesWeb guide, you will have a live instance of Docker Metabase running through Docker Compose and exposed to the internet through a domain and secured using TLS. So why wait any longer? Let’s get started.
Table Of Content
What is Metabase and Why Run it With Docker?
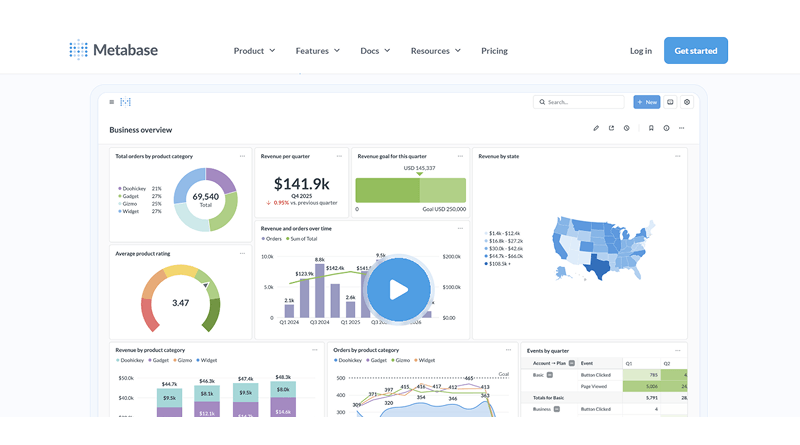
Metabase is a visual analytics application that transforms unstructured, raw data into visual dashboards, graphs, and reports. One of the key advantages of Metabase is that it allows you to perform this without requiring an in-depth knowledge of SQL. You can visualize your data by clicking and filtering without writing complex SQL queries to get insights from your data. As a result, teams make quicker decisions without relying on developers for every bit of insight.
Setting up Metabase can be challenging for most beginner users. With traditional installations, you have to set up Java, manage dependencies, and make sure that versions work together properly. Metabase Docker simplifies all of these tasks for users.
Essential Read: Docker Vs. Docker Container
Docker is like a lunch box; instead of going around collecting all the ingredients, cooking them, and then having to clean up afterwards, everything you need to run Metabase is contained within the box. All you need to do is open the box up and start using it. Technically speaking, Docker packages your application, its environment, and dependencies into an easy-to-deploy unit, which allows your application to run on any managed VPS server.
Benefits of using Metabase Docker with Metabase
- No need to manually install any dependencies or deal with dependency issues.
- Quicker to set up and deploy.
- Easier upgrades and greater portability between servers.
Using Docker with Metabase eliminates approximately 90% of the complexity of what typically would be involved in setting up Metabase from scratch as a beginner.
The final setup flows from your browser → yourdomain.com → Nginx reverse proxy → Metabase Docker container → your database.
In layman’s terms, users access your site by your domain name. Then Nginx is installed on Ubuntu independently secures the connection before forwarding the request to its Metabase Docker image. Later, Metabase connects with your database to generate dashboards.
The use of an Nginx reverse proxy in combination with Metabase running as an Nginx Docker image allows you to create a production-ready Metabase instance that is secure, scalable, and easy to maintain.
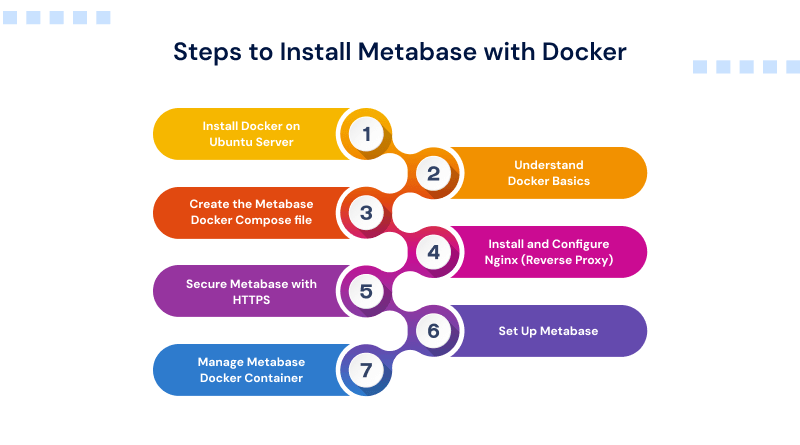
Step 1: Install Docker on your Ubuntu Server
Most online tutorials assume you have Docker installed already, but for new users that’s where problems often occur. We at MilesWeb understand what a beginner needs. Hence, in this step-by-step process, we will install Docker from scratch onto an Ubuntu 22.04 system with each command explained so you will understand how everything works in full detail.
1. Update your package list
sudo apt updateThis command tells Ubuntu to refresh its list of available software packages.
As long as you check the latest versions of all your apps before installing anything, you’re good! To avoid installing an out-of-date version of a program, always run the above command before each installation.
Expected output (simplified):
Hit:1 http://archive.ubuntu.com/ubuntu jammy InRelease
Reading package lists... Done
2. Install Docker using the official repository
The default repository for Docker in Ubuntu is outdated, so install it from the official Docker repository to ensure that you have the latest stable version of Docker.
1. Install required dependencies
sudo apt install apt-transport-https ca-certificates curl software-properties-common -y- apt-transport-https: It allows secure package downloads
- ca-certificates: This verifies trusted sources
- curl: Helps downloads files from the internet
- software-properties-common: Helps manage repositories
2. Add Docker’s official GPG key
curl -fsSL https://download.docker.com/linux/ubuntu/gpg | sudo gpg --dearmor -o /usr/share/keyrings/docker-archive-keyring.gpgThis step checks that the Docker packages are authentic and have not been altered.
3. Add Docker repository
echo "deb [arch=$(dpkg --print-architecture) signed-by=/usr/share/keyrings/docker-archive-keyring.gpg] https://download.docker.com/linux/ubuntu jammy stable" | sudo tee /etc/apt/sources.list.d/docker.list > /dev/nullThis tells Ubuntu: “Download Docker from the official source instead of the default one.”
4. Update package list again
sudo apt updateNow Ubuntu knows about the new Docker repository.
5. Install Docker
sudo apt install docker-ce docker-ce-cli containerd.io docker-buildx-plugin docker-compose-plugin -yThis installs:
- Docker Engine
- CLI tools
- Container runtime
- Docker Compose (important for Metabase Docker Compose)
3. Add your user to the Docker group
sudo usermod -aG docker $USERWith Docker, you need to have sudo access by default. However, this document will show you how to eliminate that need.
After running this:
- Log out of your server
- Log back in
Beginner tip: If you do not do this step, you will receive an error message similar to this: Permission denied when trying to connect to the Docker daemon.
4. Verify Docker is working
Check Docker version
docker --versionCheck Docker Compose
docker compose versionRun a test container
docker run hello-worldThis is a full end-to-end test:
- Docker downloads a test image
- Runs it as a container
- Prints a success message
You received this message: Hello from Docker!
This means everything is working as expected for your installation. You have now completed your installation process, and you are now able to move on to running Metabase / Docker after completing the next step.
Step 2: Understand Docker Basics in 3 Minutes
Before starting Docker for Metabase, it helps to have a basic mental picture of what’s happening. Without this knowledge, commands executed with Docker feel as if you’re simply copying items from one computer into another computer. When you have a mental model of what’s occurring, everything begins to come together.
1. Image vs Container
- Image = a blueprint or recipe
- Container = the running application (the cooked dish)
So think about it this way:
A recipe is not something you consume, but rather an outline of how to create the dish that you will ultimately eat.
Similarly, a Docker image contains everything needed to run Metabase, while a container is the end result of running Metabase on your server.
2. Important Commands
docker pull metabase/metabaseThis command downloads the image from Docker Hub to your server. Like downloading a ready-made recipe before cooking.
docker run metabase/metabaseThis command starts a container from that image just like taking the recipe and actually cooking the dish.
3. What is a Port?
Containers are self-contained environments. The port acts as a door that will allow the traffic in. Here’s an example: Metabase runs in the container on port 3000. You expose it to the users to allow access from their web browser. If you do not expose the port, the app is still running, but it is difficult to find it.
4. What is a Volume?
Since containers are temporary, you lose all the data present in the containers when they are deleted. A volume operates like a hard drive:
It holds your data for Metabase and persists through container restarts, container upgrades, and container failures. If you didn’t have a volume, you would lose all your dashboards if you restarted.
Visual: How It All Connects
Docker Image → (docker run) → Running Container → Port 3000 (access point) → Your Browser + Volume (persistent data storage)
Step 3: Create the Metabase Docker Compose file
Thus far, we have been running Docker commands one at a time, which is functional but not scalable.To solve this challenge, we need a docker-compose.yml file.
Instead of entering a long command each time, we define everything once in a file, and Docker retains that information for future reference.
1. Create the Metabase directory
- First, create a dedicated folder for your setup:
mkdir metabase
cd metabase- Now create the Compose file:
nano docker-compose.yml2. Write the docker-compose.yml file
Paste this inside the file:
version: "3.9"

services:
  metabase:
    image: metabase/metabase:latest
    container_name: metabase
    restart: always
    ports:
      - "3000:3000"
    volumes:
      - metabase_data:/metabase-data

volumes:
  metabase_data:
Break down of the above code (line by line)
- version: “3.9”: Defines the Docker Compose format. You can keep this as-is.
- services: This is where we define what we want to run.
- metabase: The name of our service (you can name it anything, but keep it simple).
- image: metabase/metabase:latest
This tells Docker which image to use.
- metabase/metabase = official Metabase image
- latest = always pulls the newest version
For production, you can later lock this to a specific version.
- container_name (metabase) Gives your container a fixed name (easier to manage later).
restart (always) If the server restarts or crashes, Metabase automatically starts again.
- ports: “3000:3000”
This is your door mapping:
- Left side = your server
- Right side = inside the container
Visiting http://your-server-ip:3000 will open Metabase.
- volumes (metabase_data:/metabase-data): It stores your data outside the container so it doesn’t get lost. Without this, all dashboards disappear on restart.
- volumes (bottom section): Defines where Docker stores that persistent data.
3. Start Metabase with Docker Compose
Run the following command:
docker compose up -d- Wait for startup
Metabase is a Java app that can take between one and two minutes to go from start to fully functioning.
If you want to see the Live Logs, type:
docker compose logs -f metabaseLook for this line in the logs:
Metabase Initialization COMPLETEThis means that Metabase has started successfully and everything is working as planned.
4. Confirm Metabase is Running
- Check container status
docker compose ps- Test with curl
curl --head http://localhost:3000This means your Metabase server is responding correctly.
- Beginner Tip (Important)
If the Docker container is looping in restarts, run the command: docker compose ps. If the container is listed as “Restarting,” your server likely doesn’t have enough memory; typically, Metabase requires ~1.5 GB free RAM to operate properly.
At this point, your Metabase Docker Compose setup is up and running; now we will add a domain name (to provide it with a production-type setup) with HTTPS.
Step 4: Install and Configure Nginx as a Reverse Proxy
After the above steps, your Docker Metabase service is accessed at http://your-server-ip:3000. While this works, it is not optimized for production use.
To be more efficient for end-users, we would want them to use http://your-domain.com rather than having to remember an IP and port combination. This is where Nginx is positioned as a reverse proxy service.
For a simple example, imagine Nginx as a receptionist. The visitors arrive at the building at the front desk (the domain), and the receptionist, Nginx, will send their requests to the Metabase Docker container running on port 3000.
1. Install Nginx
sudo apt install nginx -y- Allow HTTP and HTTPS through firewall
sudo ufw allow "Nginx Full"This opens:
- Port 80 (HTTP)
- Port 443 (HTTPS)
Without this, your site won’t be accessible publicly.
2. Create the Nginx config file for Metabase
sudo nano /etc/nginx/sites-available/metabase.conf- Paste this configuration:
server {
    listen 80;
    server_name your-domain.com;

    location / {
        proxy_pass http://localhost:3000;
        proxy_set_header Host $host;
        proxy_set_header X-Real-IP $remote_addr;
        proxy_set_header X-Forwarded-For $proxy_add_x_forwarded_for;
        proxy_set_header X-Forwarded-Proto $scheme;
    }
}
3. Enable the site and reload Nginx
sudo ln -s /etc/nginx/sites-available/metabase.conf /etc/nginx/sites-enabled/- Always test before reloading
sudo nginx -t- Reload Nginx
sudo systemctl reload nginx4. Test in browser
Navigate to http://your-domain.com. You should now see the welcome page of Metabase. At this point, you should be able to access your Docker Metabase installation from a clean domain name.
Next, you need to secure it using HTTPS so it’s protected and trusted.
Useful Read: OpenVZ vs Docker: A Comprehensive Comparison
Step 5: Secure Metabase with HTTPS (Let’s Encrypt)
Currently, your Metabase Docker installation is operational; however, it is not secure. Without using HTTPS, all of your login information, including your Metabase administrator password, is transmitted over the internet in clear text.
Anyone with access to that network may be able to view this information. Even within internal applications, this can lead to significant security concerns. The positive aspect? You can accomplish this with Let’s Encrypt and free SSL certificates with two commands.
1. Install Certbot
sudo apt install certbot python3-certbot-nginx -yCertbot provides several services including the following:
- provides communication to Lets Encrypt.
- checks if you own the domain.
- installs/sets up SSL automatically to use with NGINX.
- eliminates the need to do the certificate setup manually.
2. Get your SSL certificate
Run:
sudo certbot --nginx -d your-domain.com- What happens next (important for beginners): You’ll be prompted with a few questions:
- Enter your email: It’s used for expiry alerts
- Agree to terms: Type Y and continue
- Share email (optional): You can choose Yes/No
- Choose redirect option- Select-Redirect HTTP to HTTPS
(Always choose a redirect. This ensures all traffic is secure.)
- Test HTTPS
Now visit:
https://your-domain.comYou should see:
- Metabase loading normally
- A padlock in the browser
This means your Docker Metabase setup is now encrypted and secure.
3. Verify SSL auto-renewal
Certificates issued by Let’s Encrypt last for 90 days. Certbot can automatically renew your certificate up to 10 days prior to expiry only if you have an active timer (use the -t option).
- Check renewal service
sudo systemctl status certbot.timerThis means auto-renewal is enabled.
- Test renewal (dry run)
sudo certbot renew --dry-runThis confirms your renewal process works. Next, is the process to complete the setup inside Metabase itself.
Step 6: Set Up Metabase for the First Time
Your Metabase Docker installation is prepared, secured with an SSL certificate (HTTPS), and can be accessed from your Domain Name Services (DNS) at https://your-domain.com.
Next, it’s time to set up Metabase so that it provides useful content for you. When you navigate to your Metabase endpoint, you’ll see the Metabase welcome screen and onboarding wizard.
1. Choose language and create your admin account
When the app launches for the first time, the initial screen will prompt you to select a language of your choice.
Use this method to set up the account of the administrator.
- Name
- Email address
- Password
Please note that you are creating an administrator account, and therefore this password controls more than just signing in. This is your administrator login—the key that allows full access to your Metabase account.
This account controls:
- Dashboard
- User access
- Database connections
Make sure to save this password in a safe place (consider using a password manager). Click on the next button to continue.
2. Connect a database (or skip for now)
You’ll now see the “Add your data” screen.
What this means: Metabase needs to connect to a database (like MySQL or PostgreSQL) so it can pull and visualize your data.
If you already have a database:
- Select the type (MySQL, PostgreSQL, etc.)
- Enter host, username, password, and database name
But if you’re just starting:
Click “I’ll add my data later”
You can always add a database later:
- Go to Settings → Admin → Databases → Add Database
3. Explore the sample dashboard
Metabase includes a built-in sample dataset to help you understand how everything works.
Follow this exactly:
- Click Browse data
- Select Sample Database
- Choose any table (e.g., Orders or People)
- Click Summarize
Now:
- Change the metric (e.g., Count, Sum, Average)
- Add a group by field (e.g., Date, Category)
- Click Done
You’ll see a chart on your screen in just seconds from clicking the execute button. This is your first “success” moment where you have created a working data visualization without writing any SQL queries and without configuring your Metabase via Docker, and it is now ready for general use.
Next, we will discuss best practices for managing, upgrading, and maintaining your Metabase like a pro!
Step 7: How to Manage Your Metabase Docker Container
Most tutorials skip the step of how to install Metabase Docker, and beginners look for help with this later. Installing Metabase Docker is simple, but maintaining it means your dashboards should be secure, up-to-date, and working properly.
1. How to upgrade Metabase
Metabase releases updates regularly. With Docker, upgrading is simple:
docker compose pull
docker compose up -d
What happens here is docker compose pull command downloads the latest Metabase image and docker compose up -d command recreates the container with the new version
Important Note: Your data is in a Docker volume outside of the container itself; therefore, it’s secure. The benefit of using Metabase Docker Compose is that you can upgrade without losing any of your data.
2. How to stop, start, and restart
To manage your setup, you do not need to perform another installation.
- docker compose stop: Stops Metabase (like turning the device off).
- docker compose start: Turns them on again.
- docker compose restart: Starts in a single command.
Dashboards and settings are unaffected by any of the above changes. If something breaks, logs tell you exactly why. Use this command:
docker compose logs -f metabaseThis shows a live stream of what Metabase is doing.
3. How to back up your Metabase data
Backup your Metabase data in a Docker volume. The Metabase application contains your dashboards, users, and settings in a Docker volume. You should back the data up on a regular basis.
Follow this command example shorthand to back up your Metabase data:
docker run --rm -v metabase_metabase_data:/data -v $(pwd):/backup ubuntu tar czf /backup/metabase-backup.tar.gz /dataThis will:
- Mount your Docker volume containing the Metabase data.
- Compress the contents of the Docker volume into a single file.
- Back up this file in the appropriate location on the server.
4. Where to store backups
Don’t store all your backups on the local database server. Instead, use external storage:
- Amazon S3
- Google Drive
- Another cloud storage solution
If you lose or experience a significant failure of your local database server, backups will be the alternatives to restore your Metabase dashboards and settings. Cloud VPS servers provide better backup and restoration options.
5. Final Insight
Docker Metabase is easier to manage than traditional installations:
- Updates = 2 commands
- Restarts = 1 command
- Backups = 1 file
Once you learn these concepts, you can run Metabase in a production-like environment.
Final Note
Congratulations!
You’ve successfully installed Metabase using Docker and Nginx and have it secured (via HTTPS) on a domain. Originally, it was just a standard server, but now it is a fully functional analytics platform with an established configuration built off a clean Docker Compose file for Metabase.
You can now connect actual databases, create dashboards, and share valuable information without being reliant on expensive subscription-based BI tools or complicated process models.
Your production-ready Metabase is running on Docker using HTTPS. This is something that most data teams spend thousands of dollars on to obtain in SaaS-type products.
FAQs
1. Can I install Metabase using Docker on Ubuntu 20.04?
Yes, you can install Metabase Docker on Ubuntu 20.04 without any issues. Docker abstracts most system-level dependencies, so the setup process remains almost identical to Ubuntu 22.04. As long as Docker and Docker Compose are installed correctly, your Docker Metabase environment will run smoothly regardless of the minor OS version difference.
2. What are the prerequisites for installing Metabase with Docker?
You need a basic Ubuntu server (20.04 or 22.04), at least 1.5–2 GB RAM, and a non-root user with sudo access. Docker and Docker Compose must be installed, and your firewall should allow ports (80/443 for web access). For a production-ready Metabase Docker compose setup, a domain name is recommended but not mandatory.
3. How do I access Metabase after installation?
Once your container is running, you can access Metabase in two ways:
Via IP: http://your-server-ip:3000
Via domain (recommended): https://your-domain.com
Using a domain with HTTPS provides a more secure and professional access point for your Docker Metabase instance.
4. DWhat are the benefits of running Metabase with Docker?
Running Metabase Docker simplifies deployment and maintenance. You avoid manual installations, eliminate dependency conflicts, and can upgrade with just a couple of commands. It also ensures consistency across environments and keeps your data safe using volumes. Overall, Docker Metabase is faster to deploy, easier to manage, and more reliable for long-term use.