In the contemporary era dominated by the internet, having a website stands as the optimal strategy for being competitive. With the right information, establishing a website would not be a difficult task. But how to create a website?
This blog provides comprehensive instructions for effortlessly creating a website.
All you have to do is follow some easy steps and you will be able to establish a website easily and effortlessly. When you think of creating a website, the first thing is finding a web hosting platform for the website. At times establishing a website might seem to be an intimidating project, however, it is surprisingly easy if you have the basic idea of the website in mind.
Why to Build A Website?
First, you need to define the objective of your website in its creation process. Why is it necessary? If you have the subsequent design, content, and functionality decisions. Here’s how to do it:
- Identify the goal of your website: Understanding the primary objective of a website is essential. Consider the following questions.
- What is the main objective of your website?: Identify whether the website is built to sell products, share personal insights, showcase your portfolio, offer services, or serve another purpose. It shapes the overall structure and content strategy. If you want to sell products, your website should have eCommerce features, product pages, and a user-friendly shopping experience.
- Research Competitors: Analyzing competitors offers valuable insights into what works and doesn’t meet your niche. Start by listing websites offering similar products or services. These can be the direct competitors or sites in related niches. Analyze the website design and functionality. Map out the following:
- Pros: What do these websites do well? It could include their design aesthetics, user experience, or specific features.
- Cons: Identify areas where websites quickly improve, like poor navigation or lack of mobile optimization.
- Content strategy: What content type can be produced on the website? How often do they update it?
- User engagement: Look at how users engage with the audience through social media interactions and other channels.
- Pick and Register Your Domain Name: Choosing and registering the custom domain name is crucial while the website is set up. A well-chosen domain name can make a positive first impression on visitors and convey professionalism and credibility. Also, while not the sole factor, having a keyword-rich domain name can contribute to optimization efforts by signaling relevance to search engines.
- Plan Your Site Structure: Organizing your website building process creates important structures that make your pages easier to find by users. When users and search engines follow a consistent navigation system your website becomes more attractive for both groups.
- Users find their way through your website better when its structure follows a clear pattern which improves visitors’ connection to your site and lowers the number of visitors who leave.
- User experience: An intuitive structure helps users navigate your website easily, increasing engagement and reducing bounce rates.
- SEO benefits: Search engines use structure to understand and index content. Influencing how your website ranks on search engine result pages.
- Content organization: A well-planned structure helps you organize content logically, making it easier to manage and update over time.
Steps of how to create a website
Step 1 Register The Domain Name
Whether you are setting up a personal or business website, it is essential to establish a domain name.
A domain name is your web address on the internet. For example www.mysite.com. Without a domain name, you won’t be able to set up your hosting account.
If your business name is ‘Freelance Writer’ then your domain name can be freelancewriter.com. In case that is unavailable, you can try some other variations. You can also add the name of your town or state at the end of the name like freelancewriterdelhi.com. If you have any ideas about the domain name you can Check the availability on MilesWeb’s Free Domain Name Registration.
Where can I register my domain name?
If you have selected the web hosting company, you can check if the domain name is available on the web hosting company website. Once you have selected the appropriate domain name, you can move forward for setting up the hosting account.
If you have a Domain Name in mind, check if it is available here.
Step 2 Set Up The Web Hosting Account
Now that you have selected the domain name, it has to be hosted somewhere. A web hosting is a service that connects your site to the internet. Your entire website’s content, images and other files will be stored on a web server. To make your site live on the web, you will have to sign up for a web hosting account and then it can be accessed through the internet.
Where can I get website hosting?
1. Go to www.milesweb.in (or a web host of your choice)
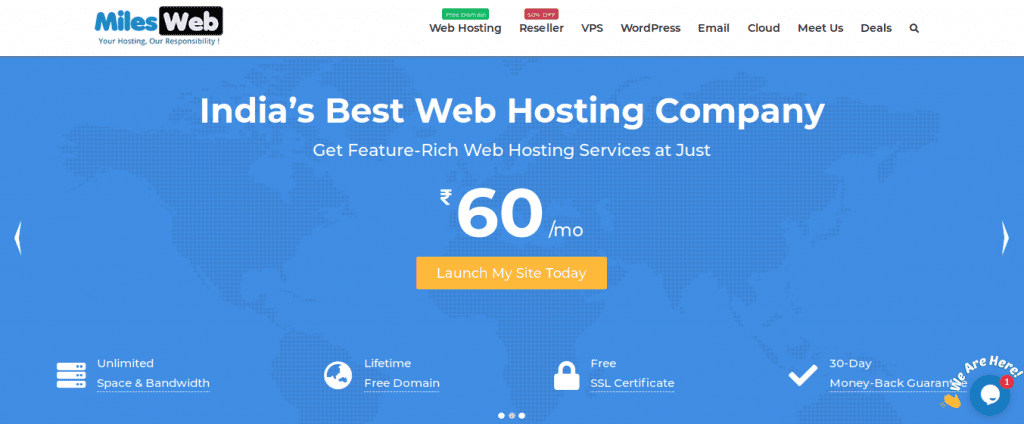
2. Choose your web hosting plan
Depending upon the type of website you are building choose the plan that meets the need of your website. The types of web hosting services that MilesWeb offers:
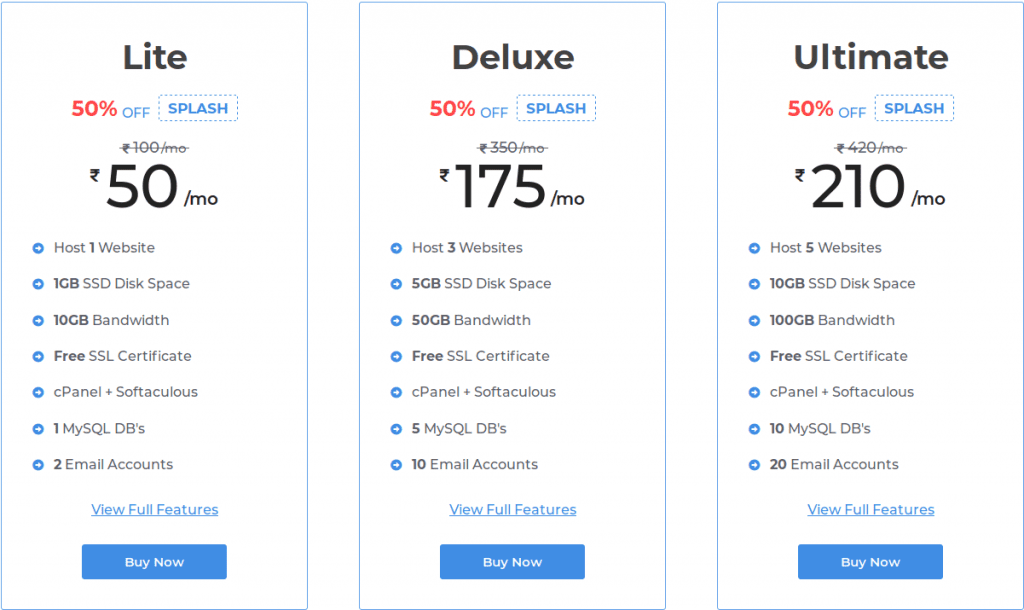
So how do you select the right one? It’s not at all difficult! You can start with a shared hosting account and as the website grows, the hosting package can be upgraded.
MilesWeb Shared Hosting Plans:
To get the best web hosting deal follow these two basic rules:
- Avoid free hosting packages from non-reputable hosting companies.
- Select a well-established web hosting company.
With some research, you will come across reliable web hosting plans to select from. Preferably, select a web host that offers 24/7 support so that if there is an issue with your website, it can be sorted right away. You must ensure that you get a web hosting package through which the smooth running of the website is possible and does not result in lot of downtimes. When you go to the website of any web hosting company, you will come across an online chat option. Through chat, you can discuss everything with them before signing up for a hosting account.
However, if you have a website with high traffic, it’s better to go with an unlimited web hosting plan.
No matter which plan you choose, at the later stage, if you want you can always upgrade your plan depending upon your needs.
3. Select a domain name
Once you have added a suitable web hosting plan in the cart. The next step is to enter your domain name, if you have already purchased a domain name, choose “I already have a domain for the hosting plan” else register a new one.
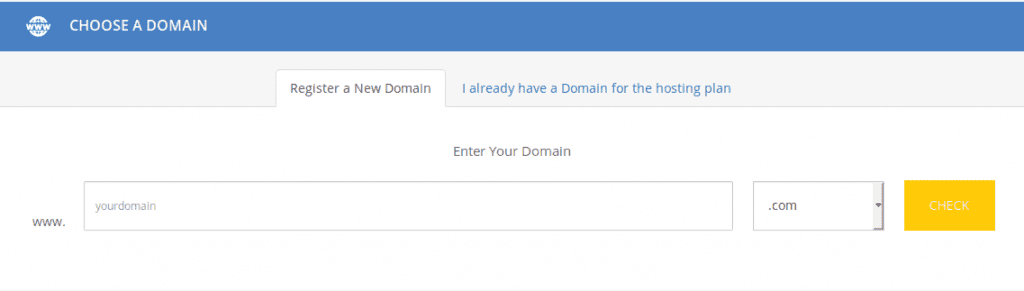
If you have questions about selecting a domain name, here’s a quick tip: For your personal blog or a website, you can go with www.yourname.com but if you have a business, your domain name should always be www.mybusinessname.com. Always go with .com/ .net/ .org domain extension unless other extensions suit the services you offer.
4. Make payment
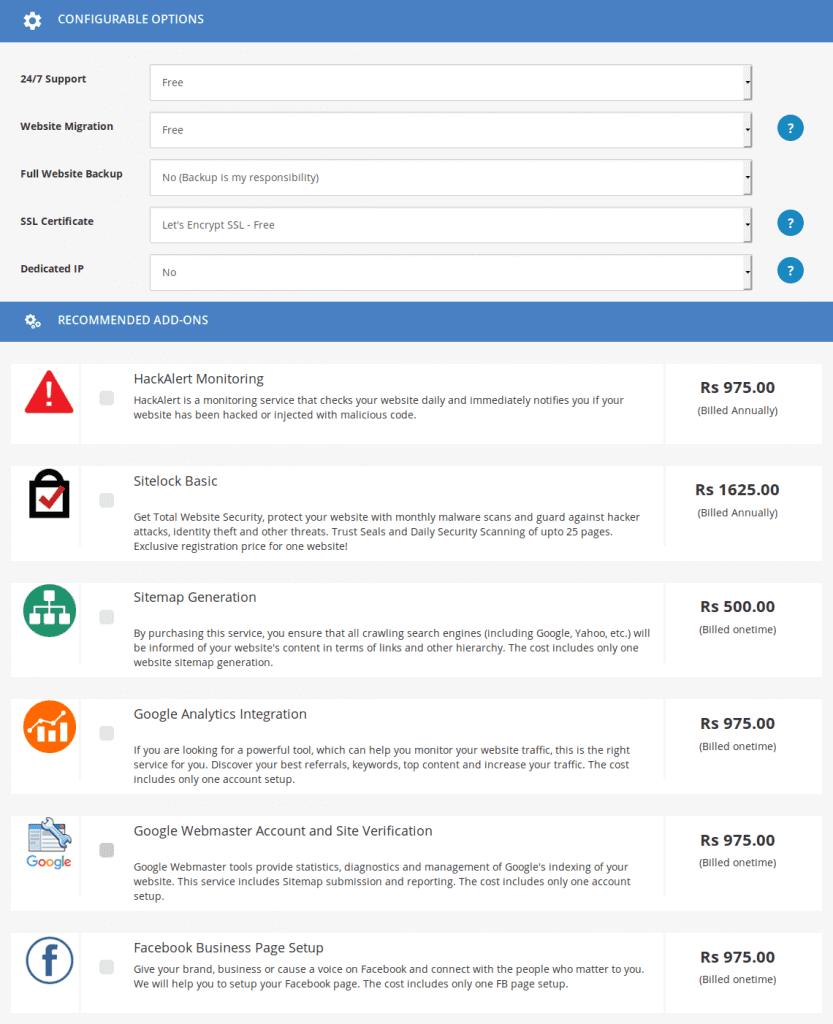
- You will have to enter all your details like your first name, email, contact number, etc.
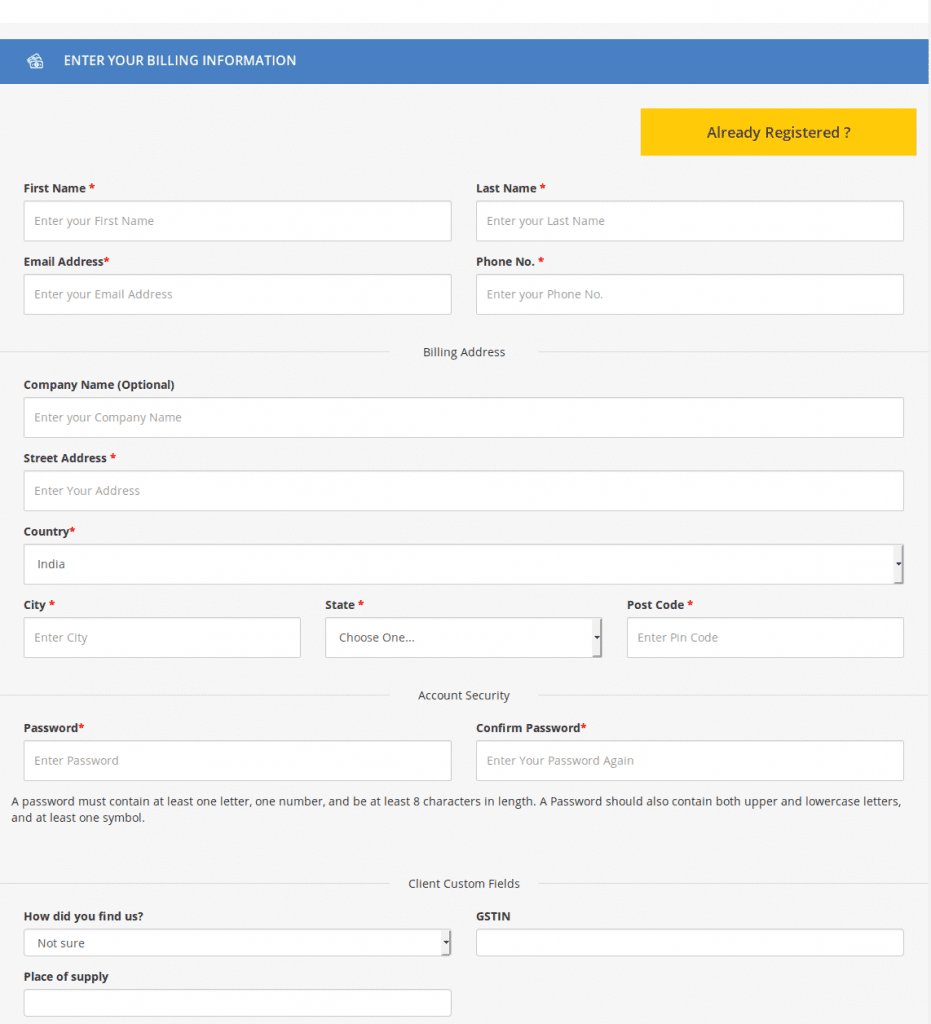
- All the information like login details and invoice will be sent to you on this email ID.
- You can also add your business details in this form but that’s optional.
- A list of add-ons is available that you can choose from such as SiteLock, HackAlert monitoring, Google Analytics integration and more.
- Once you fill in all the details choose your payment gateways and click “Place Order” and make the payment, your account will be created.
5. Login to your account
From the client login area, you can log in to your account from where your web hosting account can be managed.
Step 3 Set up your Website
Now that you have a domain name and web hosting in place the next milestone is to set up your website. For this, you will either have to hire a web developer or an agency or install WordPress and build your site.
WordPress Installation
To install WordPress there are two ways:
- Using the one-click install or
- Manual installation
The one-click install method:
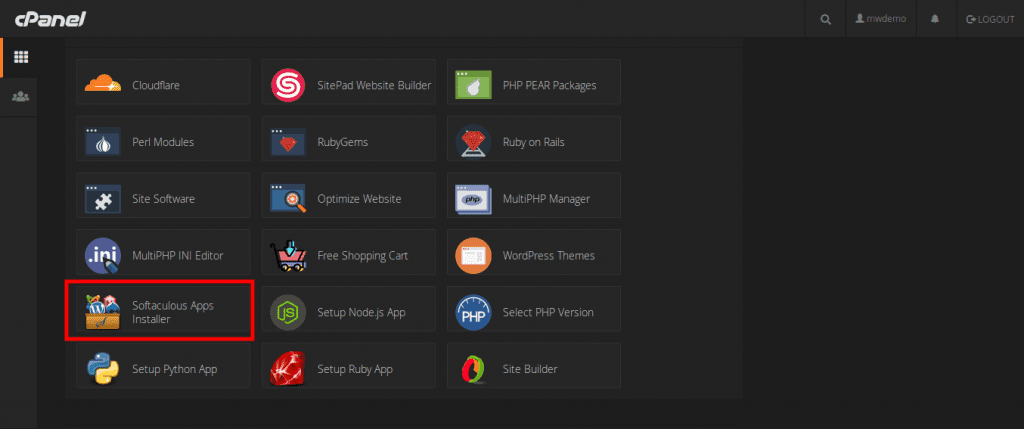
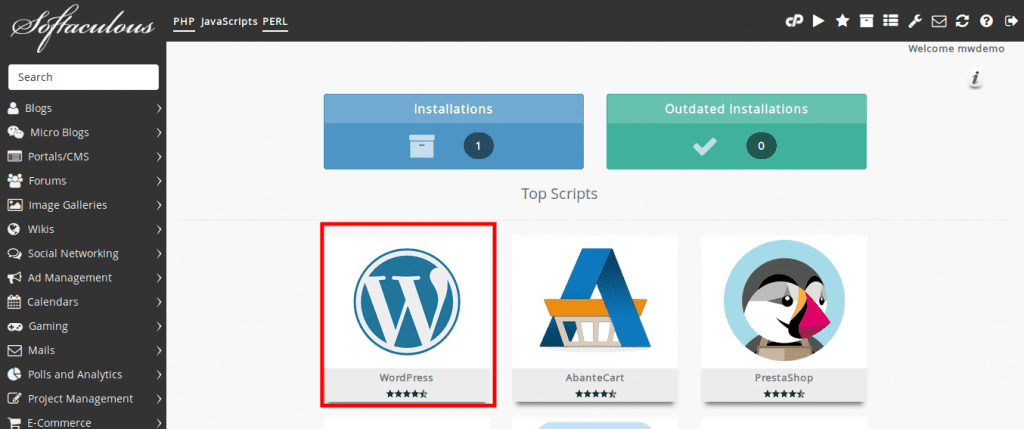
Most of the web hosting companies have 1-click installer integrated in their plans. That lets you install apps like WordPress, Joomla, Drupal and more. With MilesWeb, you will find “Softaculous installer” in your hosting account’s control panel.
Steps to install WordPress using a one-click installer:
- From the client area, login to your hosting account.
- Go to control panel.
- Locate Softaculous Installer and navigate to WordPress.
- Click on Install.
- Select the domain where you want to install WordPress and fill the rest of the details.
- By clicking “Install” WordPress will be installed on your site.
Manual installation
For those websites which aren’t hosted on MilesWeb or one-click install isn’t available you will have to install WordPress manually. Here’s how:
- Go to http://wordpress.org/download/ and download WordPress on your computer.
- Upload this file that you download on your server with the help of FTP/ File manager app or via SSH.
- Create a MYSQL Database.
- Setup wp-config.php file.
- Run the installation script.
- Complete the installation process by filling in all the details that are asked.
Related: Steps to Download and Install WordPress
Step 4 Design your Website
Once WordPress is installed on your hosting account, you’ll get a basic WordPress website. But to stand out from others, you can change its look by installing a theme on your website.
A theme is a template for your design that enhances the look and feel of your website. Here’s where you can browse themes for your website: https://wordpress.org/themes/browse/featured/
There are more than 1500 themes available online that you can choose from.
How to set up a theme?
- Log in your WordPress dashboard.
- Type https://yoursite.com/wp-admin (replace your site with your domain name) in your address bar and hit enter. From the sidebar go to “Appearance” and select “Themes”.
- Click on “Add Themes”. Here you can browse from a range of available themes and also can take a look at the live preview of a theme.
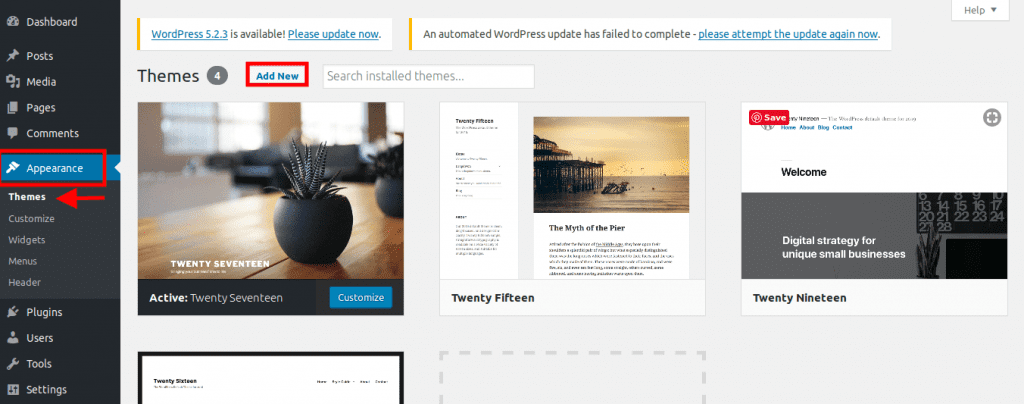
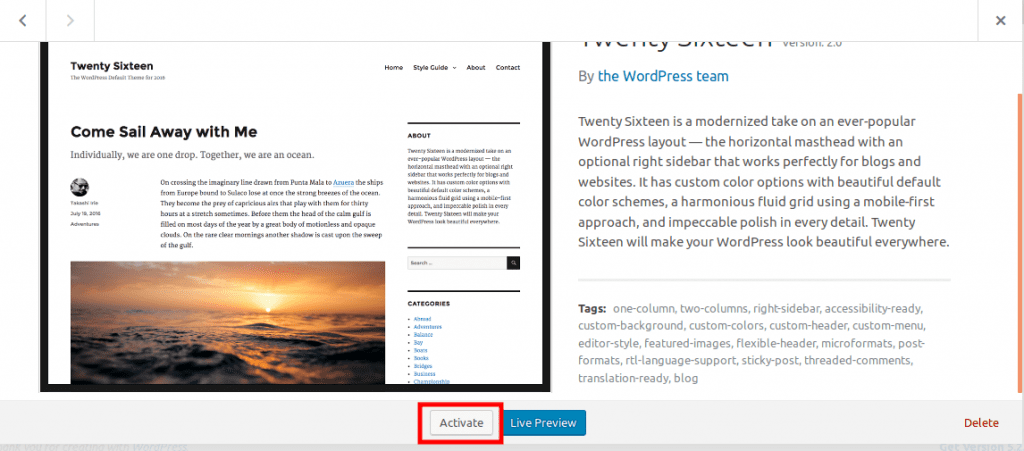
There are also third-party websites that provide a broad library of themes that you can pick from.Installing a theme is a simple task. You can search with a specific keyword to find a theme that suits your niche. Although finding a perfect theme for your website may take a while, but once you finalize it, it will be there for a long-term.
- Once you decide on a theme that you want to install, you simply have to click “Install” and later “Activate” to set up that theme on your site.
Note: If you want to change your theme, you don’t have to worry about the content and images. Those will stay as they are even though you change your theme.
Step 5 Add Content to Your Website
Create pages:
After the theme is installed, you can start by adding your content. Let’s begin with creating pages for your site.
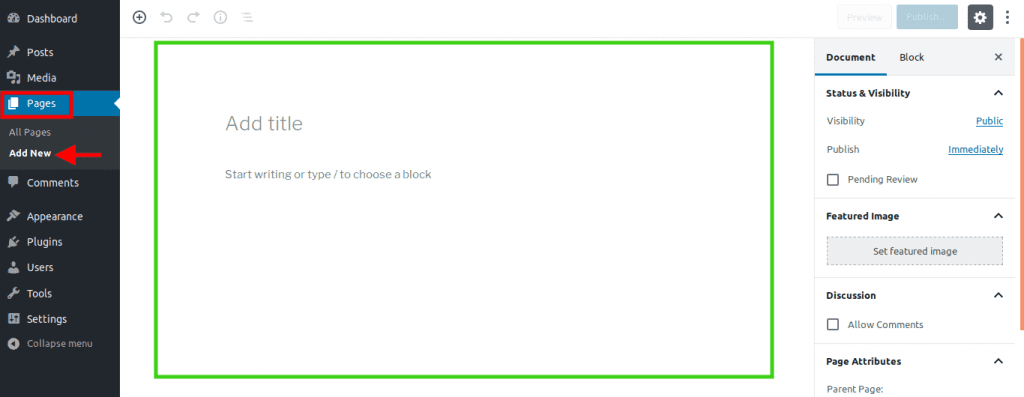
- On your WordPress dashboard, under “Pages” click “Add New”.
- Now you can add your content like text, images, title and publish it.
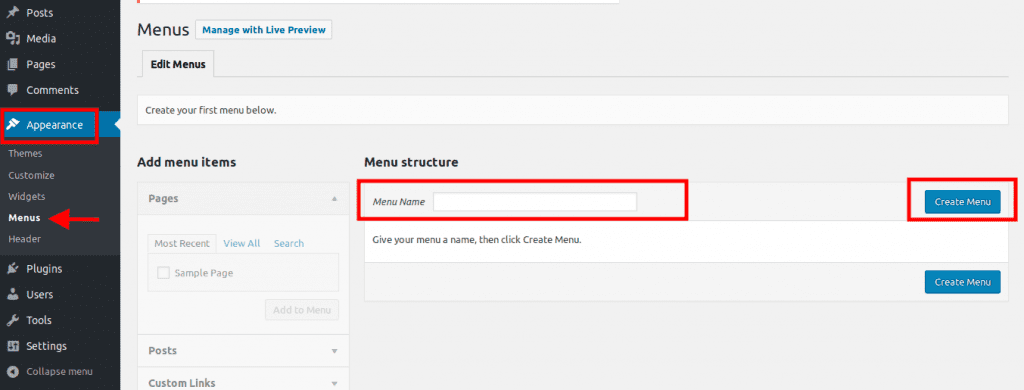
Add menus:
- Navigate to “Appearance” select “Menus”.
- Add the page you already created by clicking on the checkbox beside the page name and click “Add to menu”.
Step 6 Setting Up The Blog
If you want to add a blog to your website, you will have to add a new page first. Jump to the “Posts” section from your WordPress dashboard. Just add the blog menu and get started.
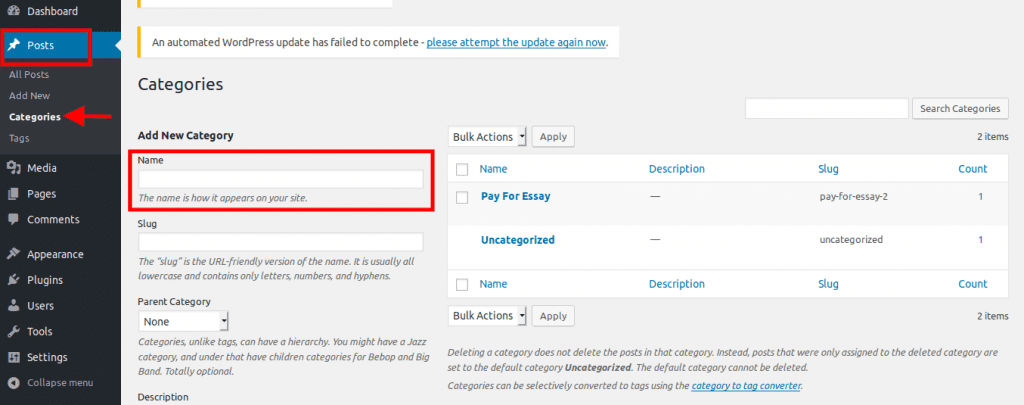
- For setting up your blog you will have to create a category.
- Go to “Posts” and click “Categories”.
Or
- Add a blog post by clicking “Add New” under “Posts”.
- Once you draft your blog post you can select the relevant category for it and publish.
Modifying your title
Page title helps the search engine know what your website is about. They play a big role in how search engines define your rankings. So, you have to be sure your page titles have all the keywords that you want to target your website for and that your site is found organically.
Your page title should be unique for every page of your website. For example, the title of this page is “Thinking Of Setting Up A Website? This Is All You Need To Know”
You will find the page title at the beginning of this page on the extreme top of your web browser’s tab (just above the address bar when you hold your mouse cursor).
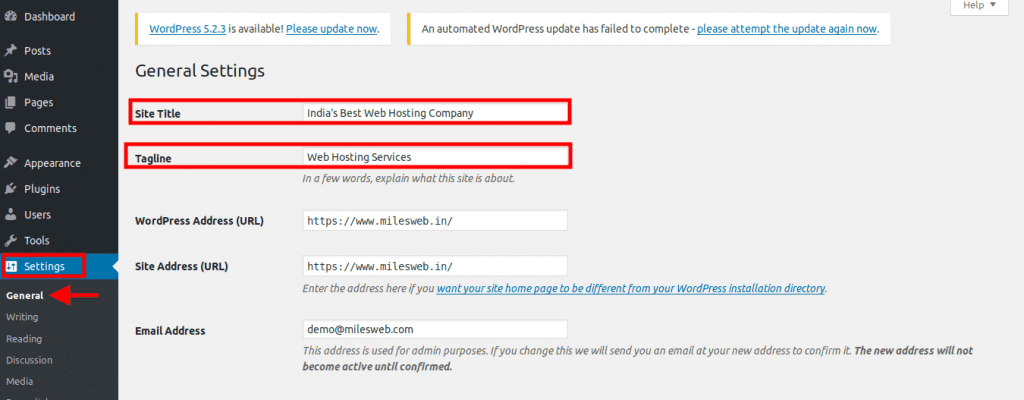
Adding tagline
Taglines are generally added after your title ends.
To change the tagline or title of your website:
- Go to “Settings” click “General”.
- Here, fill the fields of “site title” and “tagline” to complete the process.
Step 7 Several factors to consider before creating a website
Before creating a website, there are several key things you should know to ensure a successful and effective online presence:
1. Target Audience: Identify your target audience. Who is your website intended for? Knowing your audience helps you tailor your content, design, and user experience to their preferences and needs.
2. Website Platform: Decide on the platform you’ll use to build your website. Content Management Systems (CMS) like WordPress, website builders like Wix or Squarespace, or coding from scratch are common options. Choose the one that aligns with your technical expertise and requirements.
3. Design and Layout: Plan the layout and design of your website. Keep it visually appealing, easy to navigate, and responsive (mobile-friendly) to ensure a positive user experience across different devices.
4. Content Strategy: Develop a content strategy. Create high-quality, relevant, and engaging content that resonates with your target audience. This includes text, images, videos, and other multimedia elements.
5. SEO (Search Engine Optimization): Understand the basics of SEO to optimize your website for search engines. Use relevant keywords, meta tags, and other techniques to improve your website’s visibility in search results.
6. User Experience (UX): Focus on providing a seamless and intuitive user experience. Ensure fast loading times, clear navigation, and well-organized content to keep visitors engaged.
7. Security: Prioritize website security. Use HTTPS, keep your software updated, and implement security measures to protect both your data and your visitors’ data.
8. Analytics: Integrate web analytics tools like Google Analytics to track visitor behaviour, monitor site performance, and gather insights that can help you refine your website over time.
How much does it cost to create a website?
The total cost of web hosting depends on these factors:
Domain Name
The first cost that you have to incur for the website is for purchasing the domain name. The prices of the domain name might vary from registrar to registrar. You will find domain name prices on the website of the web host. Investing in a domain name is the most important cost for your website. It is preferable to have your domain name otherwise, you might have to settle for the subdomain name of the web host.
Web Hosting Account
The cost incurred for the web hosting package is a long term investment for the website. Depending on the billing cycle you select while signing up, you will have to pay the web host on a monthly, quarterly or annual basis. The process of the web hosting package might vary according to the web hosting company.
Even if you are planning to set up a personal website or a hobby website, it might not incur income in the beginning; even then it is not advisable to opt for a free web hosting account. Needless to say that if there is downtime to your website, the visitor traffic will go down. Therefore it is important to select a paid hosting package.
Website design and Development
You can either build a WordPress website by yourself or hire a freelance web developer or an agency. If you choose to build your website with WordPress you may have to pay for the themes or plugins that you use for your site. Hiring a professional agency may cost you a bit more as multiple people may work on your project. You can even hire a freelance developer that will be more cost-effective. A freelancer or the agency will charge you depending upon the overall functionalities involved on your site and the platform they use.
Software
The software required for your website will depend on the type of website you want to set up. If you are setting up a blogging website, you will only need a content management system. Along with the CMS, you also need an FTP client. FTP client is the program that enables you to transfer files from your system to your web host. If you don’t want to invest in a content management system, you can also use an ordinary web editor.
In case you are planning to have graphics on your website, it is important to have a program for designing and editing the pictures. Additionally, if you would like to design a logo for the website, it might cost extra money.
Website Promotion
While you can use the free resources for promoting your website, utilizing the paid options might provide more exposure to your website. In case you are selling goods or services on your website, you might want to spend on advertising the website. You can utilize many mediums for advertising your website like TV, magazines, newspapers and other resources on the internet. The cost of creating an ad for your website might differ as per your location; you will have to do your research. Apart from that, you can utilize the huge resource of the internet for promoting your website and reaching out to a wider range of people.
If you have an online store, you will not have to incur any separate cost for setting up the shopping cart, it is free with the web hosting package. Your web hosting budget will mainly be dependent on the five factors mentioned above. This is the basic expenditure that you will have to incur is for establishing a website.
Closure
A lot of people have the query on how to create a website but they don’t know where to start. If you want to create an online presence for your business, the guide mentioned above will give you the best insights. It will ease out the process of setting up a website for you.
The success of your website is majorly dependent on the selection of the web hosting package, website design and the marketing strategy. Put your ideas in action, go live with your website and create a great online presence.
FAQs
1. How do I create engaging website content?
When making website content be direct by presenting valuable content that matches what your audience wants to learn. Make your content easier to understand through simple words and organize information into clear parts plus use visual features for better reading. Drawing attention from your audience demands a speaking style like regular conversation plus solutions to their challenges alongside powerful sign-up or purchase prompts.
2. How do I create a visually appealing website layout?
A website that looks good needs a neat creation with matching colors and intuitive navigation. Keep whitespace open spaces work well in your design base easy-to-read text types and design your website to appear perfectly on all screen sizes. Excellent visuals combined with properly designed type and layout will create a better presentation outcome.
3. How do I optimize my website for search engines (SEO)?
To optimize your website for SEO, focus on keyword research, fast-loading pages, and mobile-friendliness. Use meta tags, alt text for images, and high-quality backlinks. Regularly update content, create SEO-friendly URLs, and structure your site with proper headings and internal links.
4. How do I secure my website from hackers?
Having SSL certificates plus selecting robust passwords while updating your site frequently keeps it secure. Deploy security plugins and activate firewalls while adding two-step verification protection. Making backups of your data, inspecting for malware regularly while controlling user access protects you from internet attacks.