Whether you’re involved in design or development, you will most likely need to export images from Figma at some time. When you are handing assets off to developers, publishing graphics to the web, or creating graphics for a mobile app, efficient image exporting from Figma will save you time and make sure image quality and file size are appropriate. In this blog, we will walk you through everything from Figma shortcuts, Figma export image settings and exporting assets to scaling for @2x or @3x.
When you finish reading this article, you’ll feel confident in exporting assets from Figma in a seamless, reproducible process. You will know how to choose the right export settings, use the correct image formats, and the proper level of compression for great quality. We will also guide you in exporting individual layers, selected items, and multiple assets at once, so you can operate efficiently when designing UI screens, social media graphics, or presentation visuals.
Related Read: What is Figma?
Table Of Content
Exploring How Export Works in Figma
When we discuss a Figma design workflow, “export image in Figma” means taking your design elements (specifically layers, frames, components), and exporting them out of Figma into image files (like PNG, JPG, SVG, PDF) that you can use outside of Figma – within a website, app, or marketing asset.
When setting your design using export settings in Figma, you have essentially provided Figma directions saying, “When I export this layer/component/frame, I want it to output as this type of image, at this size, with this suffix.” And once you understand that, you will also handle scale, naming, compression, and batch exporting, which are the key Figma components of any professional hand-off. This is an essential part of the “how to export an image in Figma” workflow.
After mastering Figma image export, you’ll be able to make your website live and enjoy a seamless online experience with the right web hosting.
Accessing Export Settings in Figma
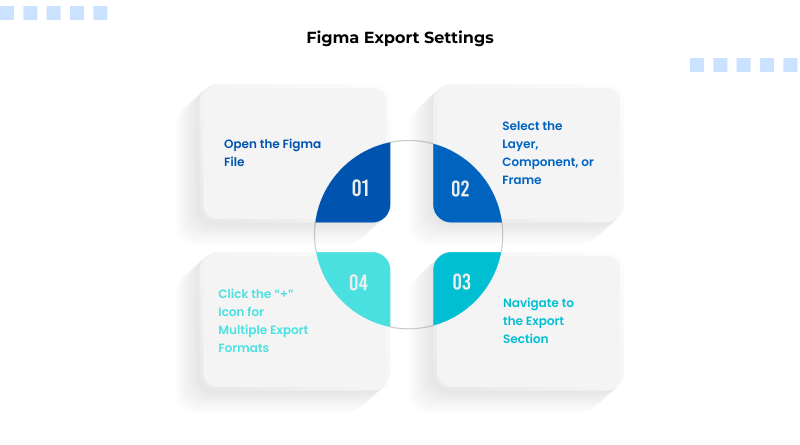
- Open your Figma file and ensure you are in the Design tab (default mode).
- Select the layer, component, or frame that you would like to export.
- Now look on the right-hand sidebar (the Design properties panel) and scroll down to the Export section (You may have to extend the panel or tap the small “+” sign beside “Export” to add an export setting).
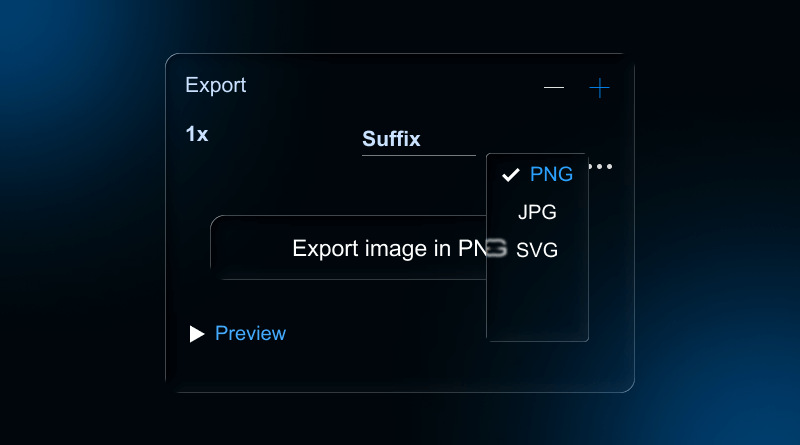
- You should see in the Export section something like this: + Export [Name] – Format: PNG (default) [and scale] (1x).
- At this stage, you can click the “+” icon to add multiple export formats or resolutions, set file name suffixes, choose a file type (PNG, JPG, SVG, or PDF), and adjust scale factors.
Once you have set these options, when you click the “Export [Name]” button (or even through the export dialog), Figma will export the image(s) according to your settings. Now you know where to locate your export image in your Figma settings.
How to Export from Figma: A Simple Process
Figma Export Selected Layers
- Switch to Design mode and select the layer or component.
- In the right sidebar, in the Export section, click the + button to add an export option (e.g., PNG 1x).
- Select your file format (PNG, JPG, SVG, or PDF) and scale (1x). You can add a suffix (e.g., @2x, @3x) if you wish.
- Click Export [Layer Name].
- Choose the folder in which to save the file.
This is the general process for exporting an image from Figma.
Exporting Multiple Assets at Once
You can export multiple assets at a given point in time. Process:
- Select multiple layers/components/frames (using Shift + Click or dragging on the canvas).
- You can apply either single or multiple export settings (format/scale) to all items within the Export section.
- Click Export. Figma will batch export your selected items. It’s a very efficient way to batch “Figma export assets.”
Exporting a Whole Frame or Page
- Select the relevant frame (the top-level frame of your document).
- In the Export setting panel, repeat the process to set the format/scale settings as previously (“for example PNG @1x, @2x”).
- Press Export.
This is useful when you want a snapshot of the entire screen (for example, in PNG format of the full screen design).
Tips when exporting
Name layers descriptively; this is important when you export a lot of assets and they save with the layer names.
- Use the suffixes (@2x, @3x) so the developer knows the exact resolution.
- Select the correct format: PNG for images with transparency or high-quality/clear graphics, JPG for photographs, and SVG for vectors and icons.
- Use @2x or @3x for high-density (Retina) screens.
Figma Export Assets: Best Practices & Troubleshooting
If dealing with multiple assets in Figma, or if handing off to developers/designers, here are some best practice guidelines:
Naming & Organisation
Name your layers/components meaningfully, like icon-menu or btn-primary.
While exporting, use a clear naming system: lowercase, hyphen-separated words, and include dimensions when necessary (e.g., icon-menu-48×48.png).
You can group assets into frames/pages or separate “Assets” pages for exporting.
Batch Export / Multiple Export Settings
You can set multiple export settings on a single layer (1×, 2×), and also export a batch of selected items at once. It is a major timesaver and a way to ensure consistency. Some users reported, “You can export images in bulk… hold command + shift and select all the images.”
Resolving Frequent Challenges
No export Figma button or option: Check that export settings have been added to the layer; if you don’t see anything in the right panel, extend it.
- Large file size: Change file type (PNG → JPG), decrease resolution, or adjust quality settings.
- Multiple asset hand-off: Don’t forget to add export settings to all layers/components to facilitate export or download for developers.
- Confusion regarding where downloads go: If using the browser version, exported images are typically laid down in the default Downloads folder. This is missed by some users.
Figma Export Image: Formats & Compression
– JPG (JPEG):
This is another raster format, but one that does not support transparency and operates as a lossy format that delivers strong compression ratios. This format is best suited for photographs or images with a strong visual aspect, where a small degradation in quality is not evident. JPG images also promote quicker page load speeds, making it one of the formats of choice for websites and other posts that require smaller file sizes or optimized images.
– PNG:
PNG format doesn’t lose quality and manages transparency, making it a great option for logos, icons, and graphics with defined or sharp edges. This format type preserves every detail of the original image, leading to a larger file size.
– SVG:
SVG is a great option for icons, logos, and illustrations when you want sharpness and clarity at all resolutions. Since SVG consists of mathematical paths instead of pixels, you can be assured SVG graphics will look crisp, whether it’s a small mobile screen or a big screen, and SVG files are usually much lighter too.
– PDF:
PDFs are best reserved for print materials, portfolios, or multi-page design assets. PDFs are not a primary choice for web images; however, they are extremely valuable when accuracy of design layout and sharing are important for maintaining consistent design across devices and operating systems.
Figma Image Compression Best Settings
- To better support standard and high-density screens, export assets at 1× and 2× scale for the web.
- Make it easier for developers to understand the scale by naming assets with the @2x suffix to indicate their magnified size.
- If exporting JPGs and the option is presented to adjust quality settings (60-80%), make the adjustment to reduce file size without visible loss.
- Some documentation varies, but they all agree to explore downloading with resampling methods (“Detailed” vs “Basic”) found under advanced options for exporting in Figma.
- If you have anything with transparency or sharp edges, PNG is the better option. For large background images or photos, JPG is the better option for file size.
Final Consideration
Exporting images and assets in Figma is an important step in the design-to-development process. Whether you’re exporting a single layer or exporting an entire set of assets for web and mobile, knowing how to export images in Figma, knowing where the Figma export settings are, how to export multiple sizes (@2x, @3x), and web optimizing will save you a lot of time, and your results will be better.
Keep in mind to do the following: name your layers correctly, select the appropriate file format, set your scale properly, batch export when possible, and test your file size/quality. By doing all of this, your exported images will be ready for their next use, web, mobile, or print.
FAQs
1. Where are the Figma export settings in the design panel?
As mentioned earlier, in Design mode, select the layer/frame/component → look to the right sidebar of the screen → scroll down to the Export area of the sidebar. If you don’t see the export area, you may need to expand the panel or add an export setting by clicking the + next to the property’s name. At this point, you can choose the format and size, the suffix, and when you click Export, you’ll download your assets.
2. How do I set up a single asset to export multiple sizes (for example, @2x, @3x) at once?
Simply select the asset in Figma and then navigate to the Export section. You can create multiple export settings by clicking + multiple times. For example, set up PNG 1× with the suffix @1x, do the same for PNG 2× with @2x, and PNG 3× with @3x. When you click Export, you’ll download all versions at once.
3. What is the best way to make an asset for Figma export for the web that’s ideal for quality and file size?
Here’s the effective way: Work in native size design in Figma and select the right format (PNG for graphics/transparency, JPG for photos, etc), set your export scale for normal and high-density screens (1× and 2×), adjust JPG quality if desired (70-80% recommended), test an appropriate file size (around below ~200/300 kb as appropriate for web export not always necessary, but optimal), name files easily understandable (lowercase, hyphens and add sizes if you find it useful), and use responsive techniques in the site.
4. Can I export multiple assets instantly from one frame or page?
Yes. In Figma, you can select multiple layers, components, or frames and apply export options to all selected assets (or batch select and export them). Once you click Export, all selected assets follow the export settings you’ve configured. This is an essential part of your “Figma export assets” workflow and is extremely helpful when you have loads of icons or images to export at once. Some users confirm you can batch export.