
Whether you want to earn an extra side income or build a primary business of web hosting, reseller hosting is one of the booming business ideas on today’s date. Share on X Without investing much, you can simply begin with your web hosting business via reseller hosting. It lets you launch a web hosting business which is hassle-free and offers outstanding profits.
Related: Steps to Follow Before Starting a Web Hosting Business
In reseller hosting, you can use the resources of a parent web hosting provider and resell these resources as if they belong to your own web hosting company. Most of the reseller hosting providers such as MilesWeb cater with white labeled web hosting which means you can sell the web hosting services with your own brand name and logo and none of your clients will ever know about this.
Reseller hosting is perfect for any business, digital agencies, web design/development agencies and even online marketers. In fact, anyone who wants to make some side income can consider getting reseller hosting. You don’t need to have high-tech knowledge to get started with reseller hosting as most of the server tasks will be handled by your parent hosting provider.
So…Are you ready to set up your reseller hosting business with MilesWeb? If yes, you must be clueless about how and where to start with? Here is a complete startup guide to help kick-start your reseller hosting business with MilesWeb.
Know More: Ultimate Guide for Web Developers: To Make Profitable Web Hosting Business
1. Buy reseller plan
Purchase a suitable plan that will fulfill the need of your clients and is good enough in terms of resources. Choosing a reseller hosting plan will completely depend upon the number of clients you have and the amount of resources their website requires.
MilesWeb provides its reseller hosting plans for both – Windows and Linux platforms. You can choose as per your requirement. Initially, you can begin with a starter plan and later upgrade the plan as your requirement increases.
You can purchase windows reseller plan and Linux reseller plan from MilesWeb via PayPal, Bank Transfer, Visa, Maestro, Rupay and few more online transaction methods. MilesWeb has the reseller hosting plans with and without WHMCS tool. You can decide-on as per your requirement.
2. Migration request
If you already have a reseller hosting account hosted with some other provider then you need to migrate your account to MilesWeb server, else you can directly jump to step 3.
To proceed for migration, we will need your cPanel/WHM login details which you can mail at support@milesweb.com. You can either move all of your domains or specific domains within your existing reseller account to MilesWeb reseller account. If you only want specific domains to be moved, send a complete list of such domains.
Once the migration process is completed, you get login details of your reseller account with MilesWeb on your email.
Related: Reasons For You To Have a Reseller Hosting Plan
3. Reseller login details sent
As soon as you make a purchase/migration process is done, your reseller account gets activated. After this, the reseller account login details are sent on your registered mail id. This will have cPanel/WHM panel details that will be used to- create hosting packages, creating cPanel accounts, change/modify packages and much more.
4. Update name servers
Once your reseller account is activated, it is required to point the domain name to MilesWeb reseller server.
By default you will get eu.solidhosting.pro, in.solidhosting.pro, sg.solidhosting.pro and us.solidhosting.pro as the nameservers with MilesWeb hosting. However, you can also register your own nameservers so as to completely rebrand your hosting under your own domain name. For example, your domain name is “resellerhost.com” you can register your own nameserver as- ns1.resellerhost.com and ns2. resellerhost.com.
This will help you to have “private nameservers” without revealing MilesWeb server names to your clients.
If you want to have private nameservers, you can register it from your domain registrar panel.
5. Create new packages in WHM
Before creating your cPanel account it is suggested to create the hosting packages first.
Creating a hosting package means deciding on a range of plans for your web hosting clients from which they can choose. You will have to specify the amount of resources you wish to allot with each plan.
To create plans follow these steps:
- Login to your WHM panel
- Locate ‘Packages’
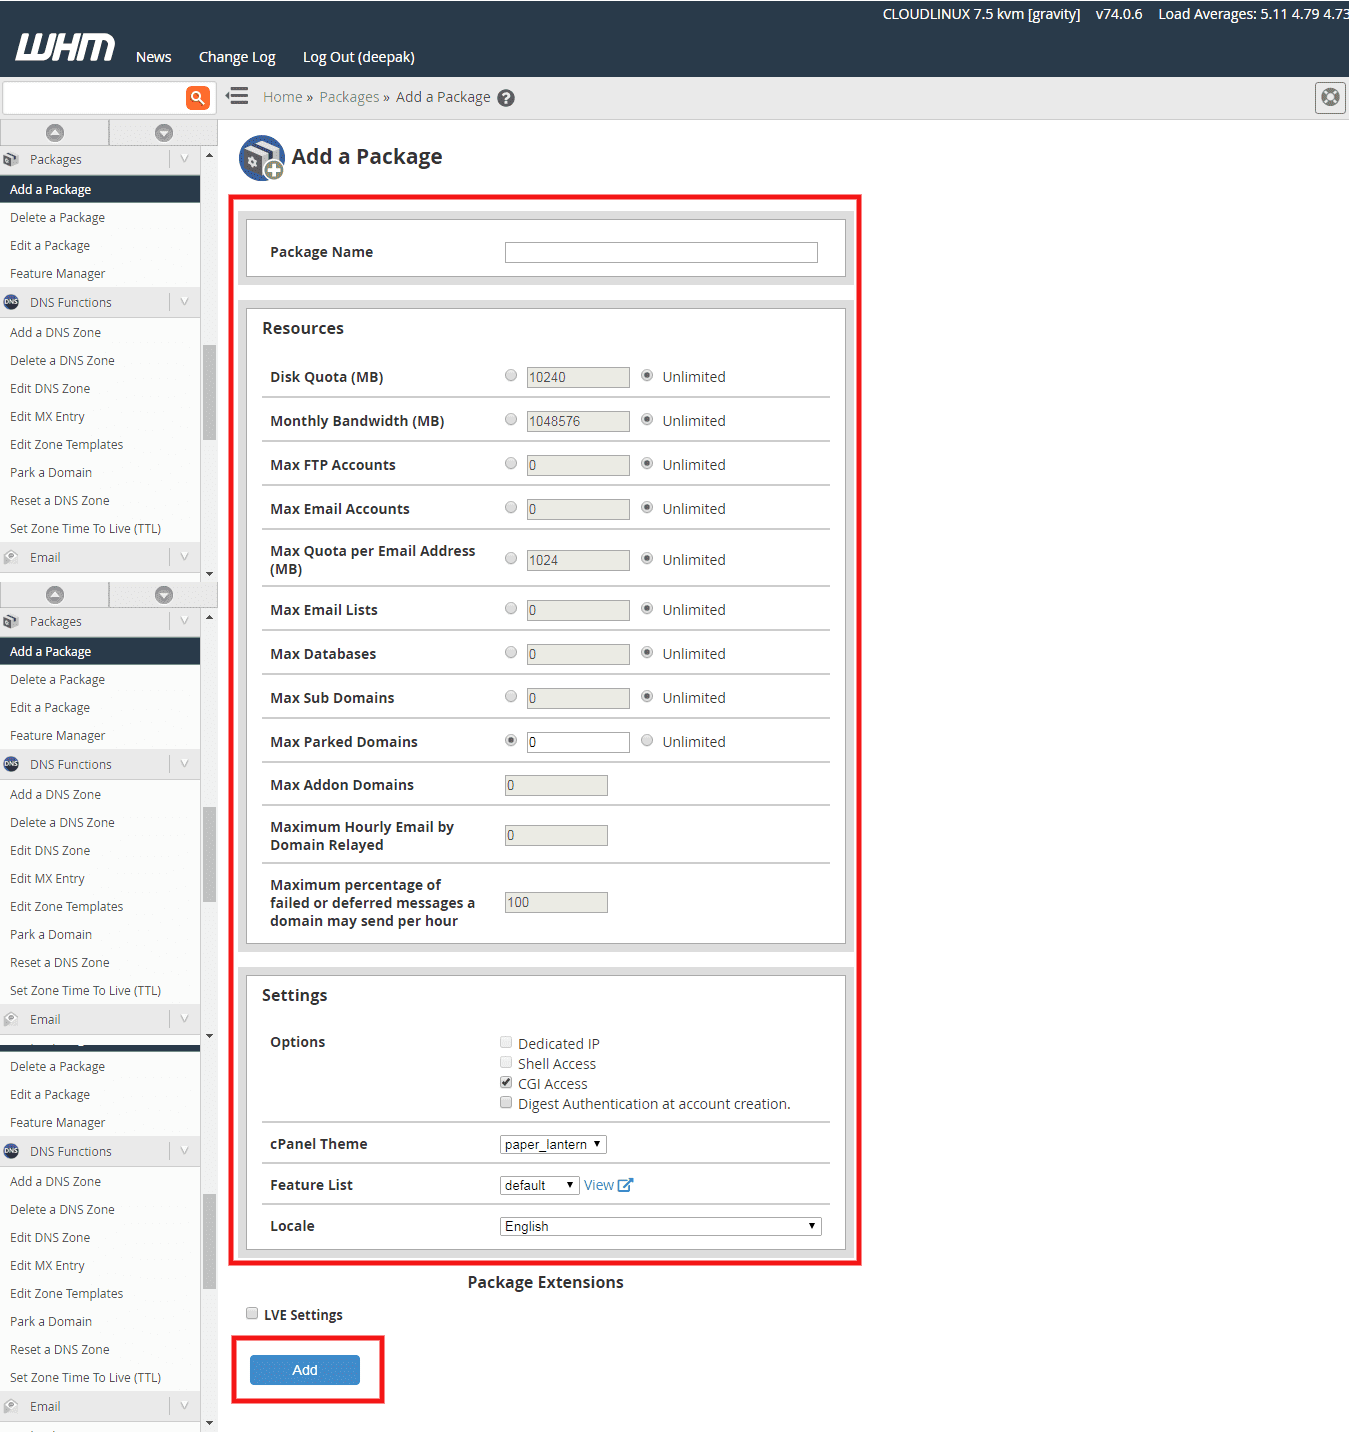
- Here, click on the very first option ‘Add a Package’
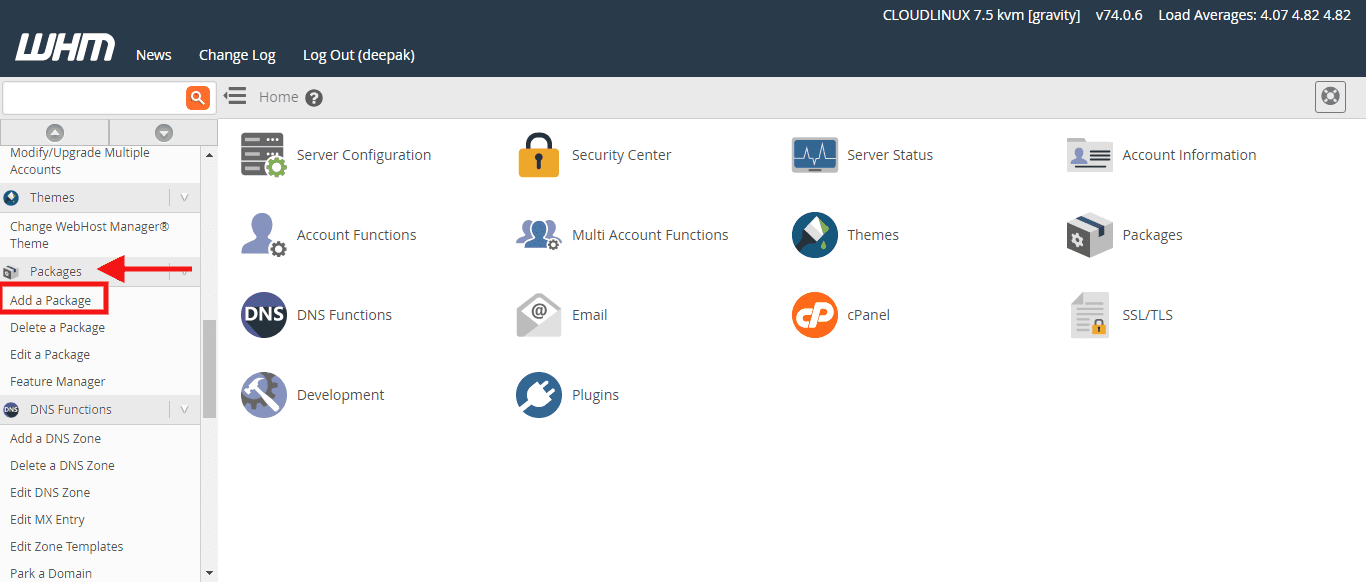
- Define the hosting package name and assign the resources such as disk space, bandwidth, subdomains etc. for each of the plans separately.
- Click ‘Add’ to create the hosting package.
6. Create cPanel account in WHM
With the help of a cPanel, you will be able to setup individual accounts for each of your client. You can give them privileges/ resources according to the plan they have purchased.
To create cPanel accounts:
- In WHM panel navigate to ‘Account Functions’
- Choose ‘Create a New Account’
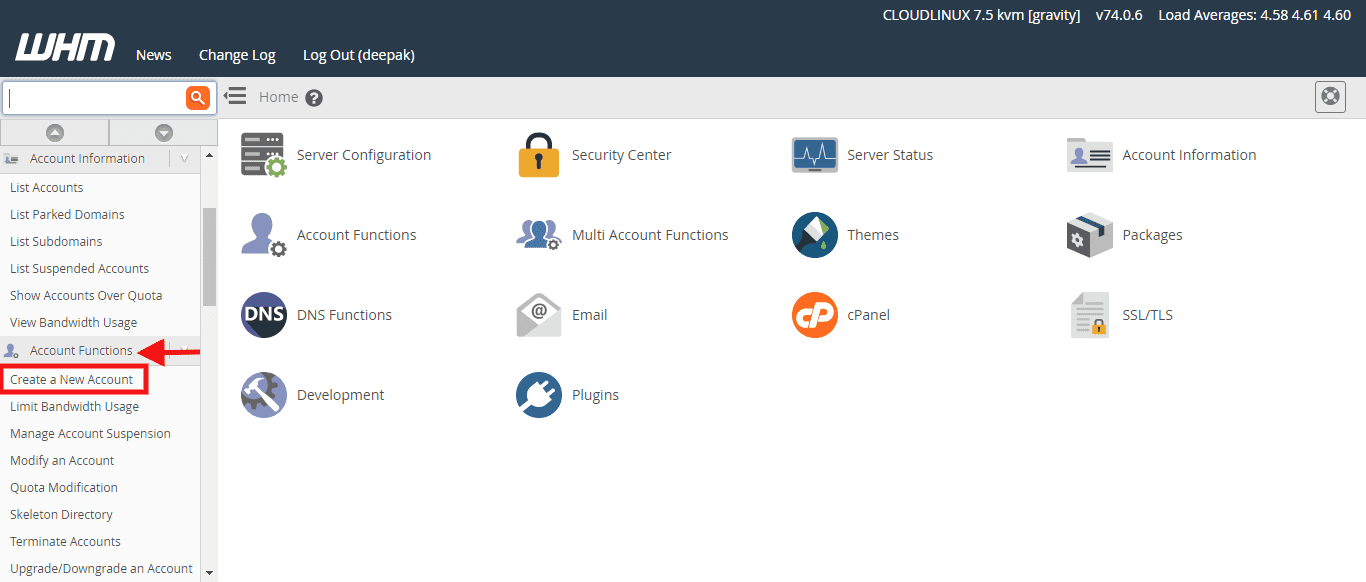
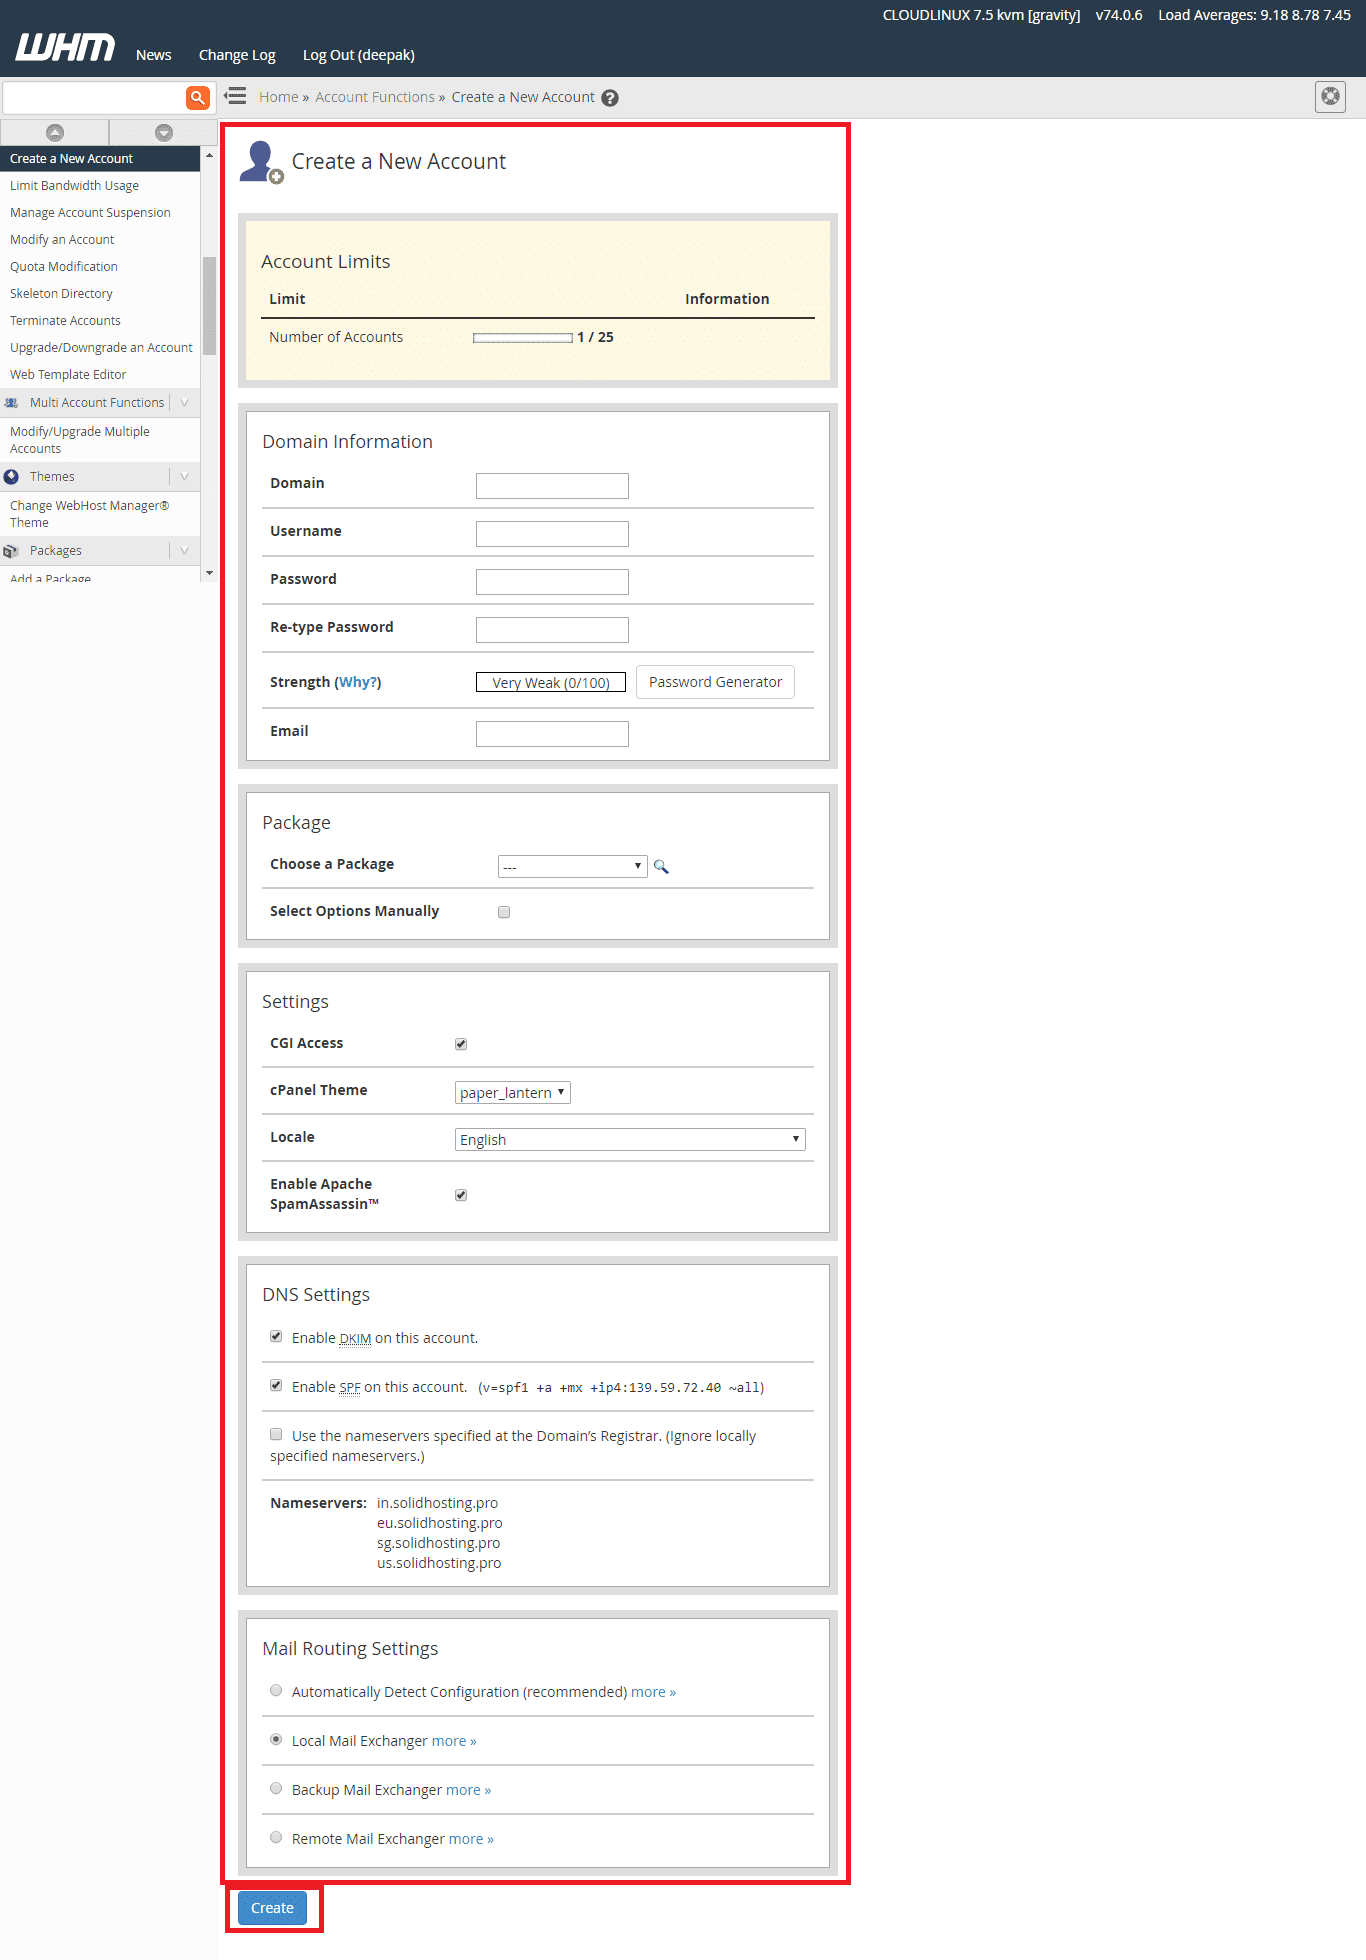
- Fill in appropriate details to create a cPanel account for your client. From here you can assign package, domain information, email account and so on.
- Click on ‘Create’ button to create cPanel account.
7. Upload website through FTP
Once you have assigned the desired package to your client, uploading their file to your server comes the next step.
Using an FTP you can transfer files between your computer and the web server. For this, you will need an FTP client such as FileZilla, Cyberduck. There are many FTP clients available on the web.
You will then need to connect FTP to MilesWeb server (use the same login details as your cPanel account). Once the connection is successfully established, the files can be uploaded.
8. WHMCS setup and configuration
WHMCS tool is a one-stop shop solution for resellers. This tool is useful for handling billing and support ticket request of your clients. It simplifies your reseller hosting business by automating all the manual operations such as billing, generating invoices, sending reminders, etc.
Thus, with every WHMCS reseller hosting plan of MilesWeb, you get the most efficient client management . Add this tool at the most competitive price for streamlining your workflow and services. However, you can also buy this tool separately if you select Smart, Plus or Pro plan.
How to install WHMCS?
It is recommended that you use the Softaculous script-installer to install WHMCS because it is one of the simplest ways to install WHMCS just within a few clicks.
Softaculous is by default included with your reseller hosting account with MilesWeb and the installation process of the WHMCS tool is done by the MilesWeb team itself.
Related: Tips For Marketing Your Reseller Hosting Business
Closure
Reseller hosting is the best way to make an additional profit. Make sure you do a complete research in advance and follow the steps mentioned above to simplify the process of setting up your reseller hosting. We hope all the above-mentioned steps will help you avoid an unnecessary headache while getting started to MilesWeb cheap reseller hosting.